Develocity Edge User Manual
Introduction
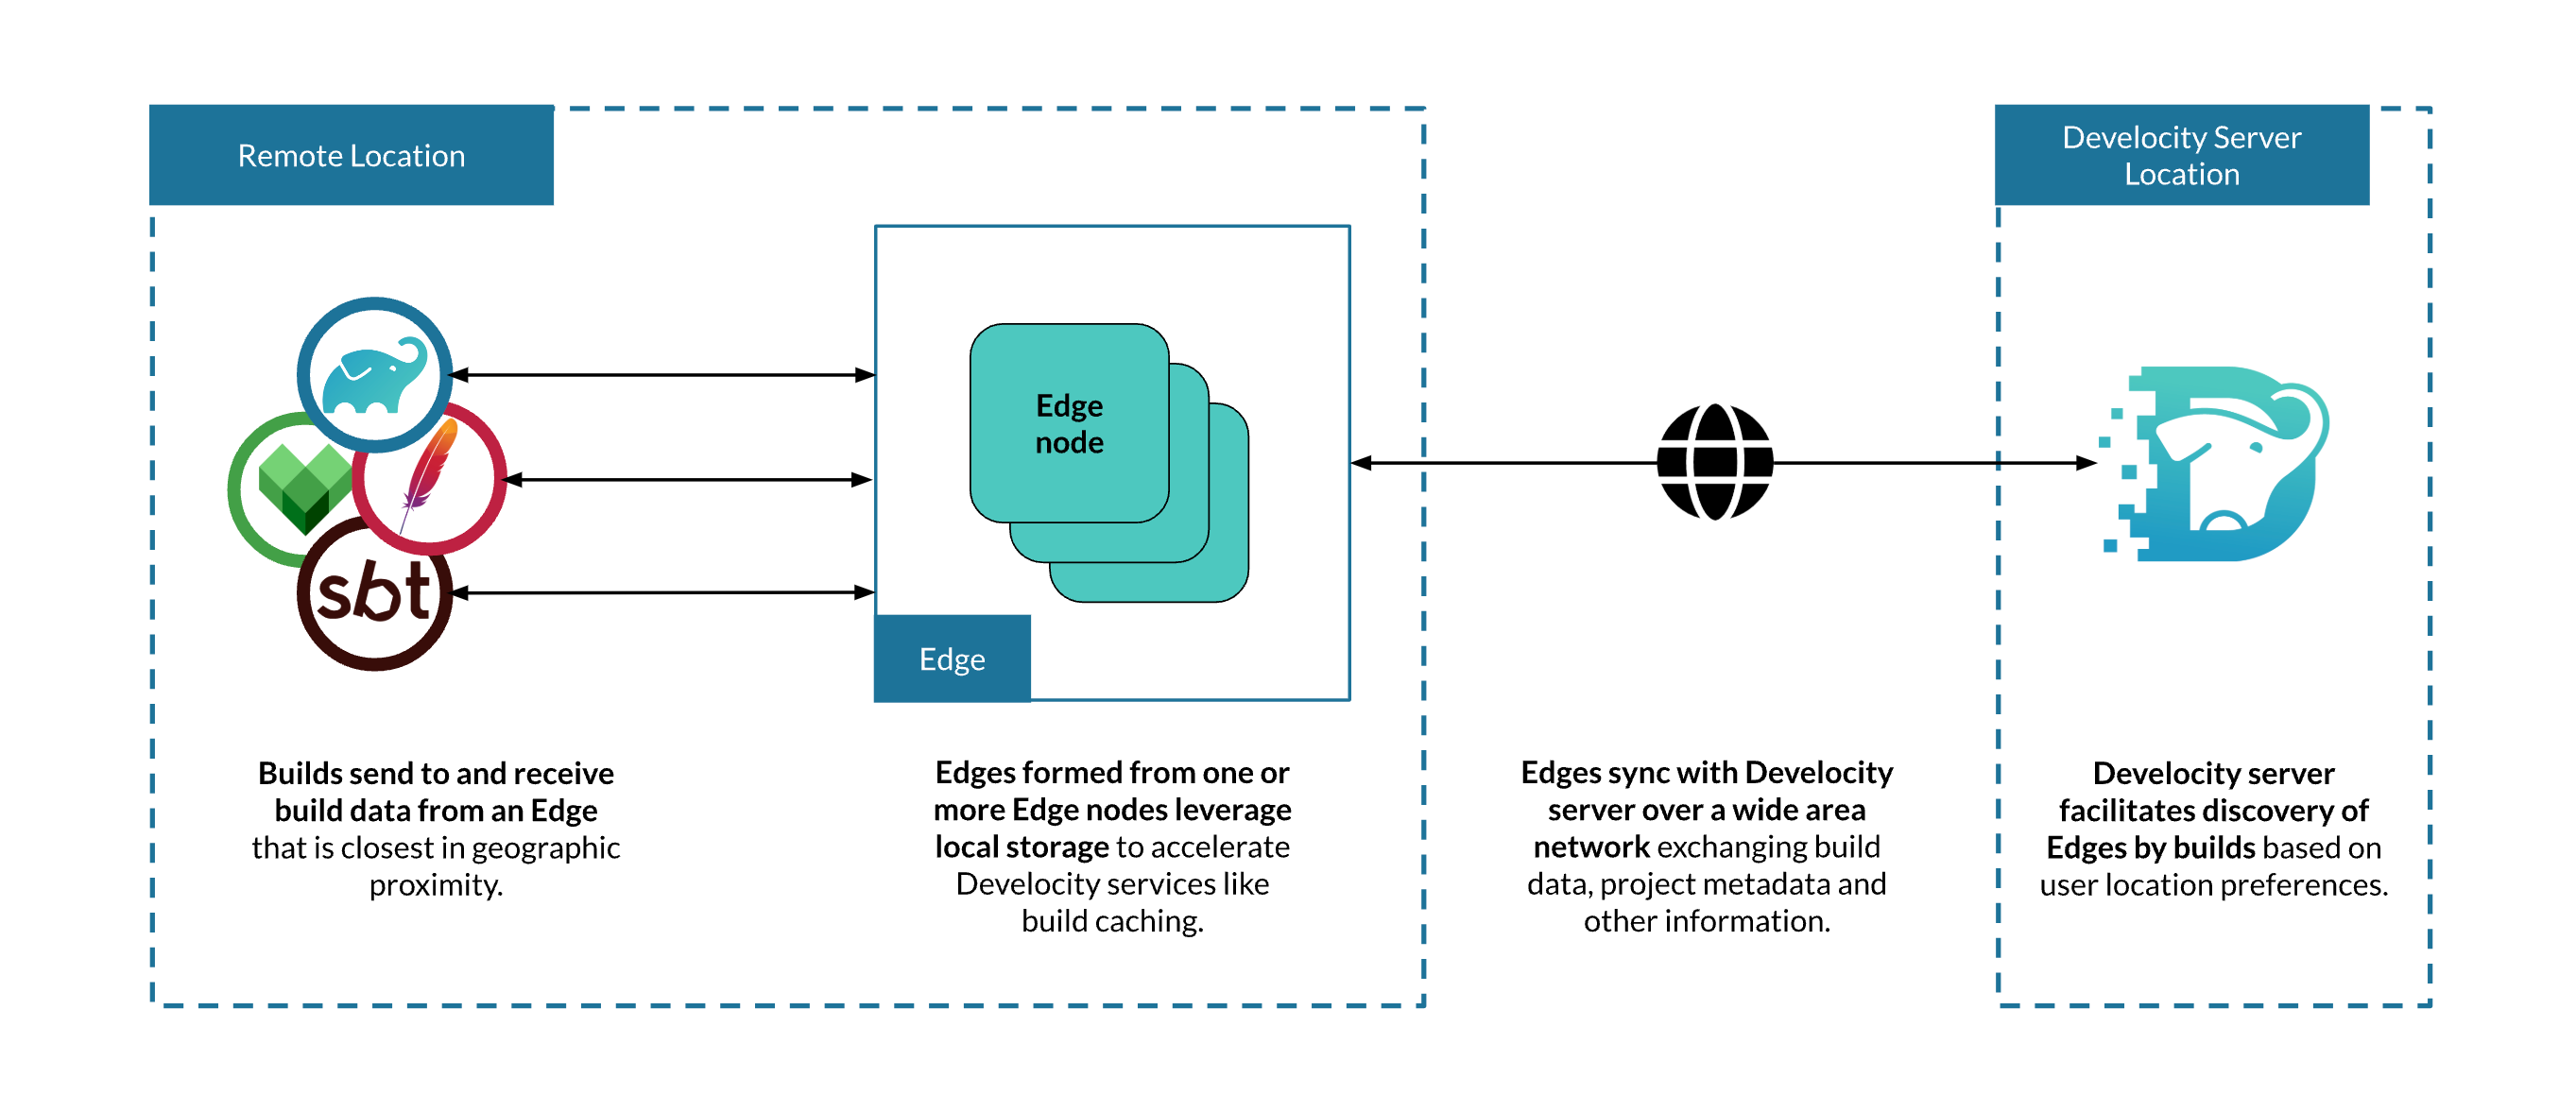
Develocity Edge makes it easier to deploy Develocity services closer to where builds are run, increasing build performance and build acceleration reliability. Edges can also act as a transparent proxy for Build Scan uploads and Model Context Protocol (MCP) requests for Develocity MCP Server and Develocity Analytics MCP Server, providing a single point of access for build and AI agents in restricted network environments.
This manual covers setting up an Edge, by creating an Edge in Develocity, installing one or more Edge nodes and connecting the node(s) to Develocity. Also covered by this manual are the steps to enable "Edge discovery" for compatible Develocity plugins and extensions to leverage the Edge network, and to configure Edge nodes to proxy Build Scan and MCP traffic.
Requirements
Develocity Configuration
To use Develocity Edge, it’s necessary to have Develocity installed.
Verify Object Storage Settings
All Edge nodes are replication-enabled, replicating data stored to and from other nodes in the Edge network, which always includes the Develocity server. This eases replication configuration, particularly when deploying a set of load-balanced nodes at an Edge location. See Replication for how replication works and what it costs.
Review your Develocity object storage configuration ahead of Edge rollout. Check that Develocity is connected to a cloud-based object storage service like Amazon S3 or, if using embedded object storage, that it’s appropriately sized. The embedded object store volume should have at least three times as much storage allocated to it as the storage allocated to the largest Edge in the network.
See the Build Cache storage section of the Develocity Administration Manual to learn more about reserving space on object storage for storing Build Cache data.
Review the Maximum Artifact Size Limit
The maximum artifact size limit configured in Develocity also applies to all Edge nodes. Any Build Cache, Artifact Cache, or Setup Cache artifact stored via an Edge node is subject to the limit configured on the Develocity server. There is no Edge-specific setting for this limit.
See the Build Cache configuration section of the Develocity Administration Manual for instructions on how to configure this value.
Administering Edges
Establishing Edges requires configuration to be applied to Develocity, either via the Develocity Administration page or imported as unattended configuration.
Refer to the Edge Administration Using Develocity section to learn more before proceeding to install an Edge node.
Edge Node Application
To establish an Edge at least one Edge node must be installed (and connected to Develocity). An Edge node is a server application responsible for processing requests from builds that apply Develocity build agents and for replicating data across the Develocity Edge network.
| Use of Gradle’s Edge node software is subject to the Gradle Terms of Use. |
The Edge node application is distributed as a Docker image via Docker Hub, and as a Edge node JAR file[executable JAR]. Both distributions offer the same functionality.
Older versions of the JAR can be found in the appendix below.
Refer also to the Kubernetes section for information on deploying an Edge node cluster.
Data Directory Disk Usage
Edge nodes require a single directory, referred to as the “data directory”, to store data and other files.
By default, Edge nodes use all the storage provided by the attached host volume.
However, a custom storage usage can be specified using the option --target-size (or the EDGE_NODE_TARGET_SIZE environment variable) to request the application to limit usage.
It’s recommended to set an explicit target storage size if the Edge node shares a storage volume with other applications, runs in Kubernetes or will regularly store large build artifacts.
| The Kubernetes quantity format should be used to express large values (e.g. '400M' = 400 megabytes, '2T' = 2 terabytes) for the target size. The value must express a whole number greater than 0 and less than 2^63-1. |
Note that the Edge node can inadvertently use more than the configured "target" storage size for log files, config files and other operational files.
Resource Requirements
Performance is generally constrained by network access to the Edge node.
Edge nodes should be hosted on compute instances geared towards sustained networking and I/O performance, for example, Amazon EC2 m5n.large.
By default, an Edge node process uses up to about 2 GiB of memory. It’s recommended to have at least 2 GiB of additional memory to spare and allocated to the OS running the Edge node process.
Java Runtime
| Edge node | Java version |
|---|---|
Version 0.1 and later |
Java 21 |
Network
Edges communicate with Develocity over HTTP/1.
Build agents communicate with Edges over HTTP/1, unless the build agent is using Bazel, in which case it communicates over gRPC HTTP/2.
| Port | Description |
|---|---|
5071 |
HTTP and gRPC build tool interface |
5072 |
Reserved for application internal use |
9090 |
Application monitoring |
Edge Administration Using Develocity
Edges can be managed using the Develocity Administration page or by applying unattended configuration.
Creating a new Edge for the first time is a multistep process that involves:
-
Generating a registration key by which Edge nodes can authenticate with Develocity to become associated with Edges.
-
Describing an Edge by specifying a stable Edge identifier, public address URL and descriptive location name.
Administration Page
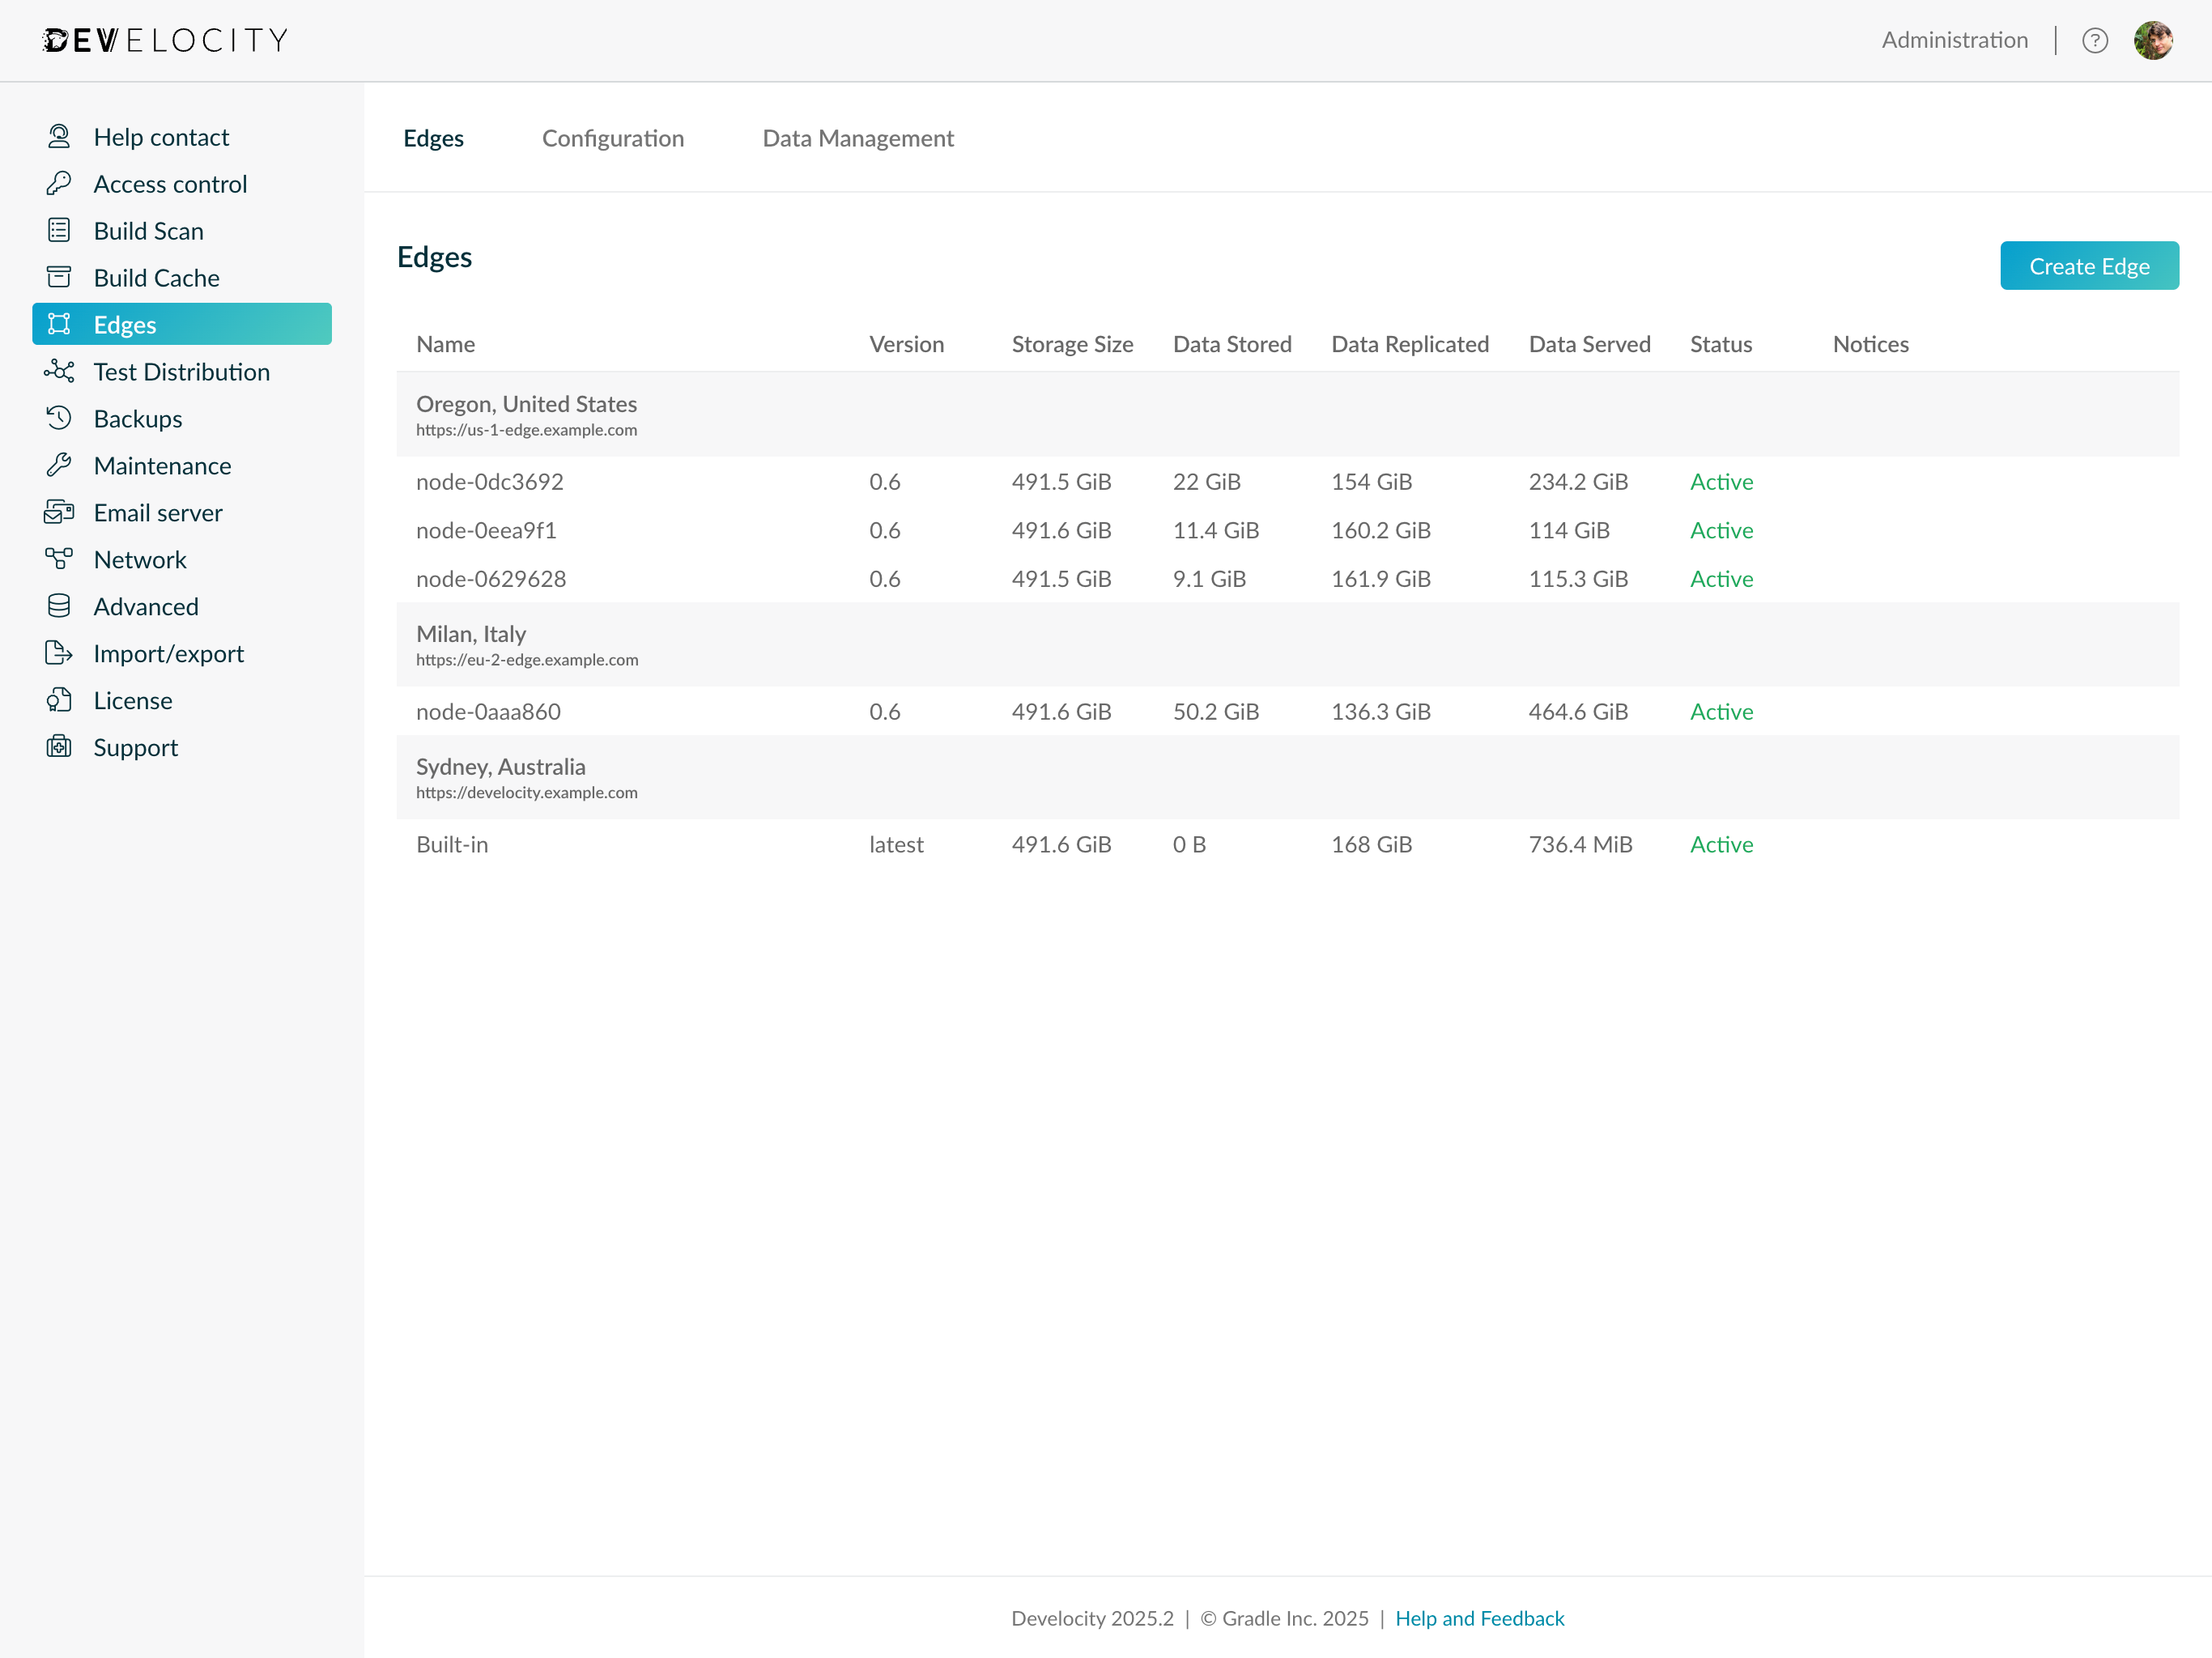
Edge configuration is located on the "Edges" tab of the Develocity Administration page.
The default page shows a list of all Edges, the Edge nodes connected from that Edge location and a summary of statistics for data transferred for each node in the past 24 hours.
Edge nodes that were connected, but haven’t recently communicated with Develocity, are listed with a status of "Inactive".
Managing Registration Keys
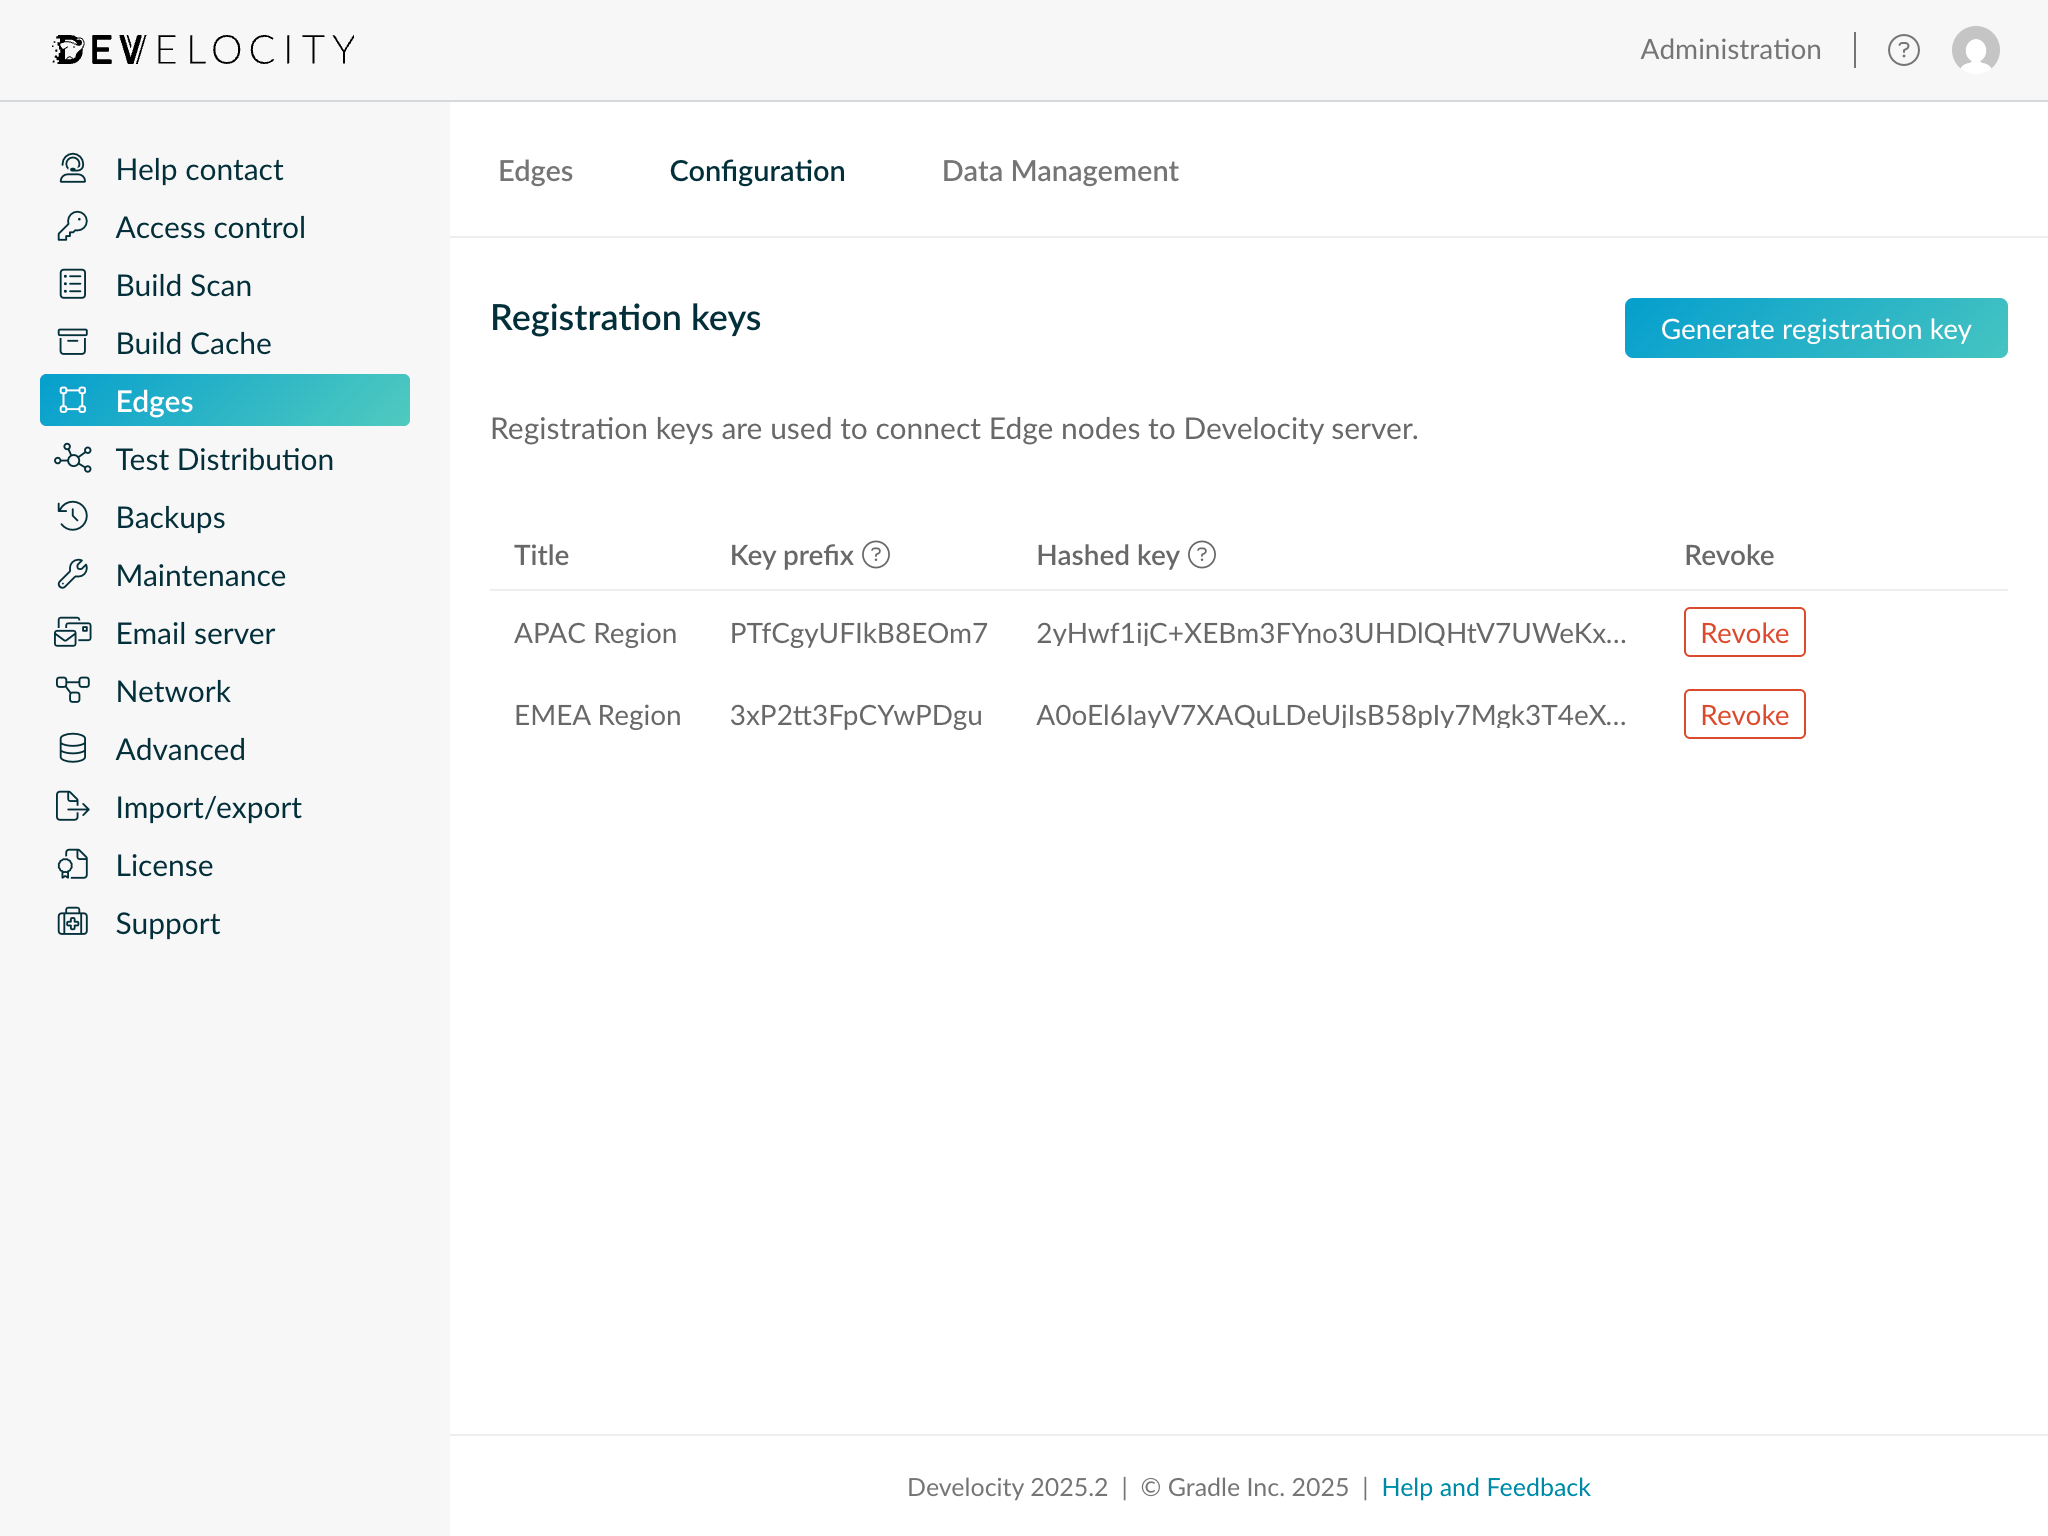
Edge registration keys allow Edge nodes to authenticate with Develocity and establish a session. Develocity stores a one-way hashed representation of the registration key string.
A single registration key can be used across all Edges (multiple Edge nodes). However, if required, multiple registration keys can be created for simplifying security and administration workflows.
Registration key management is available in the "Configuration" tab of the page.
Adding an Edge Registration Key
A new registration key can be generated by following these steps:
-
Log in to a Develocity instance as a user with "Configure edges" ("Administer Develocity" on pre-2025.4 Develocity instances) permissions.
-
Navigate to .
-
Click into the Configuration tab.
-
Click Generate registration key.
-
Input a value for the Title field on the "Generate a new registration key" page. The Title is a meaningful alias by which the key can be referred to.
-
Copy the generated registration key and store it securely. This string will be used to authenticate Edge nodes with Develocity.
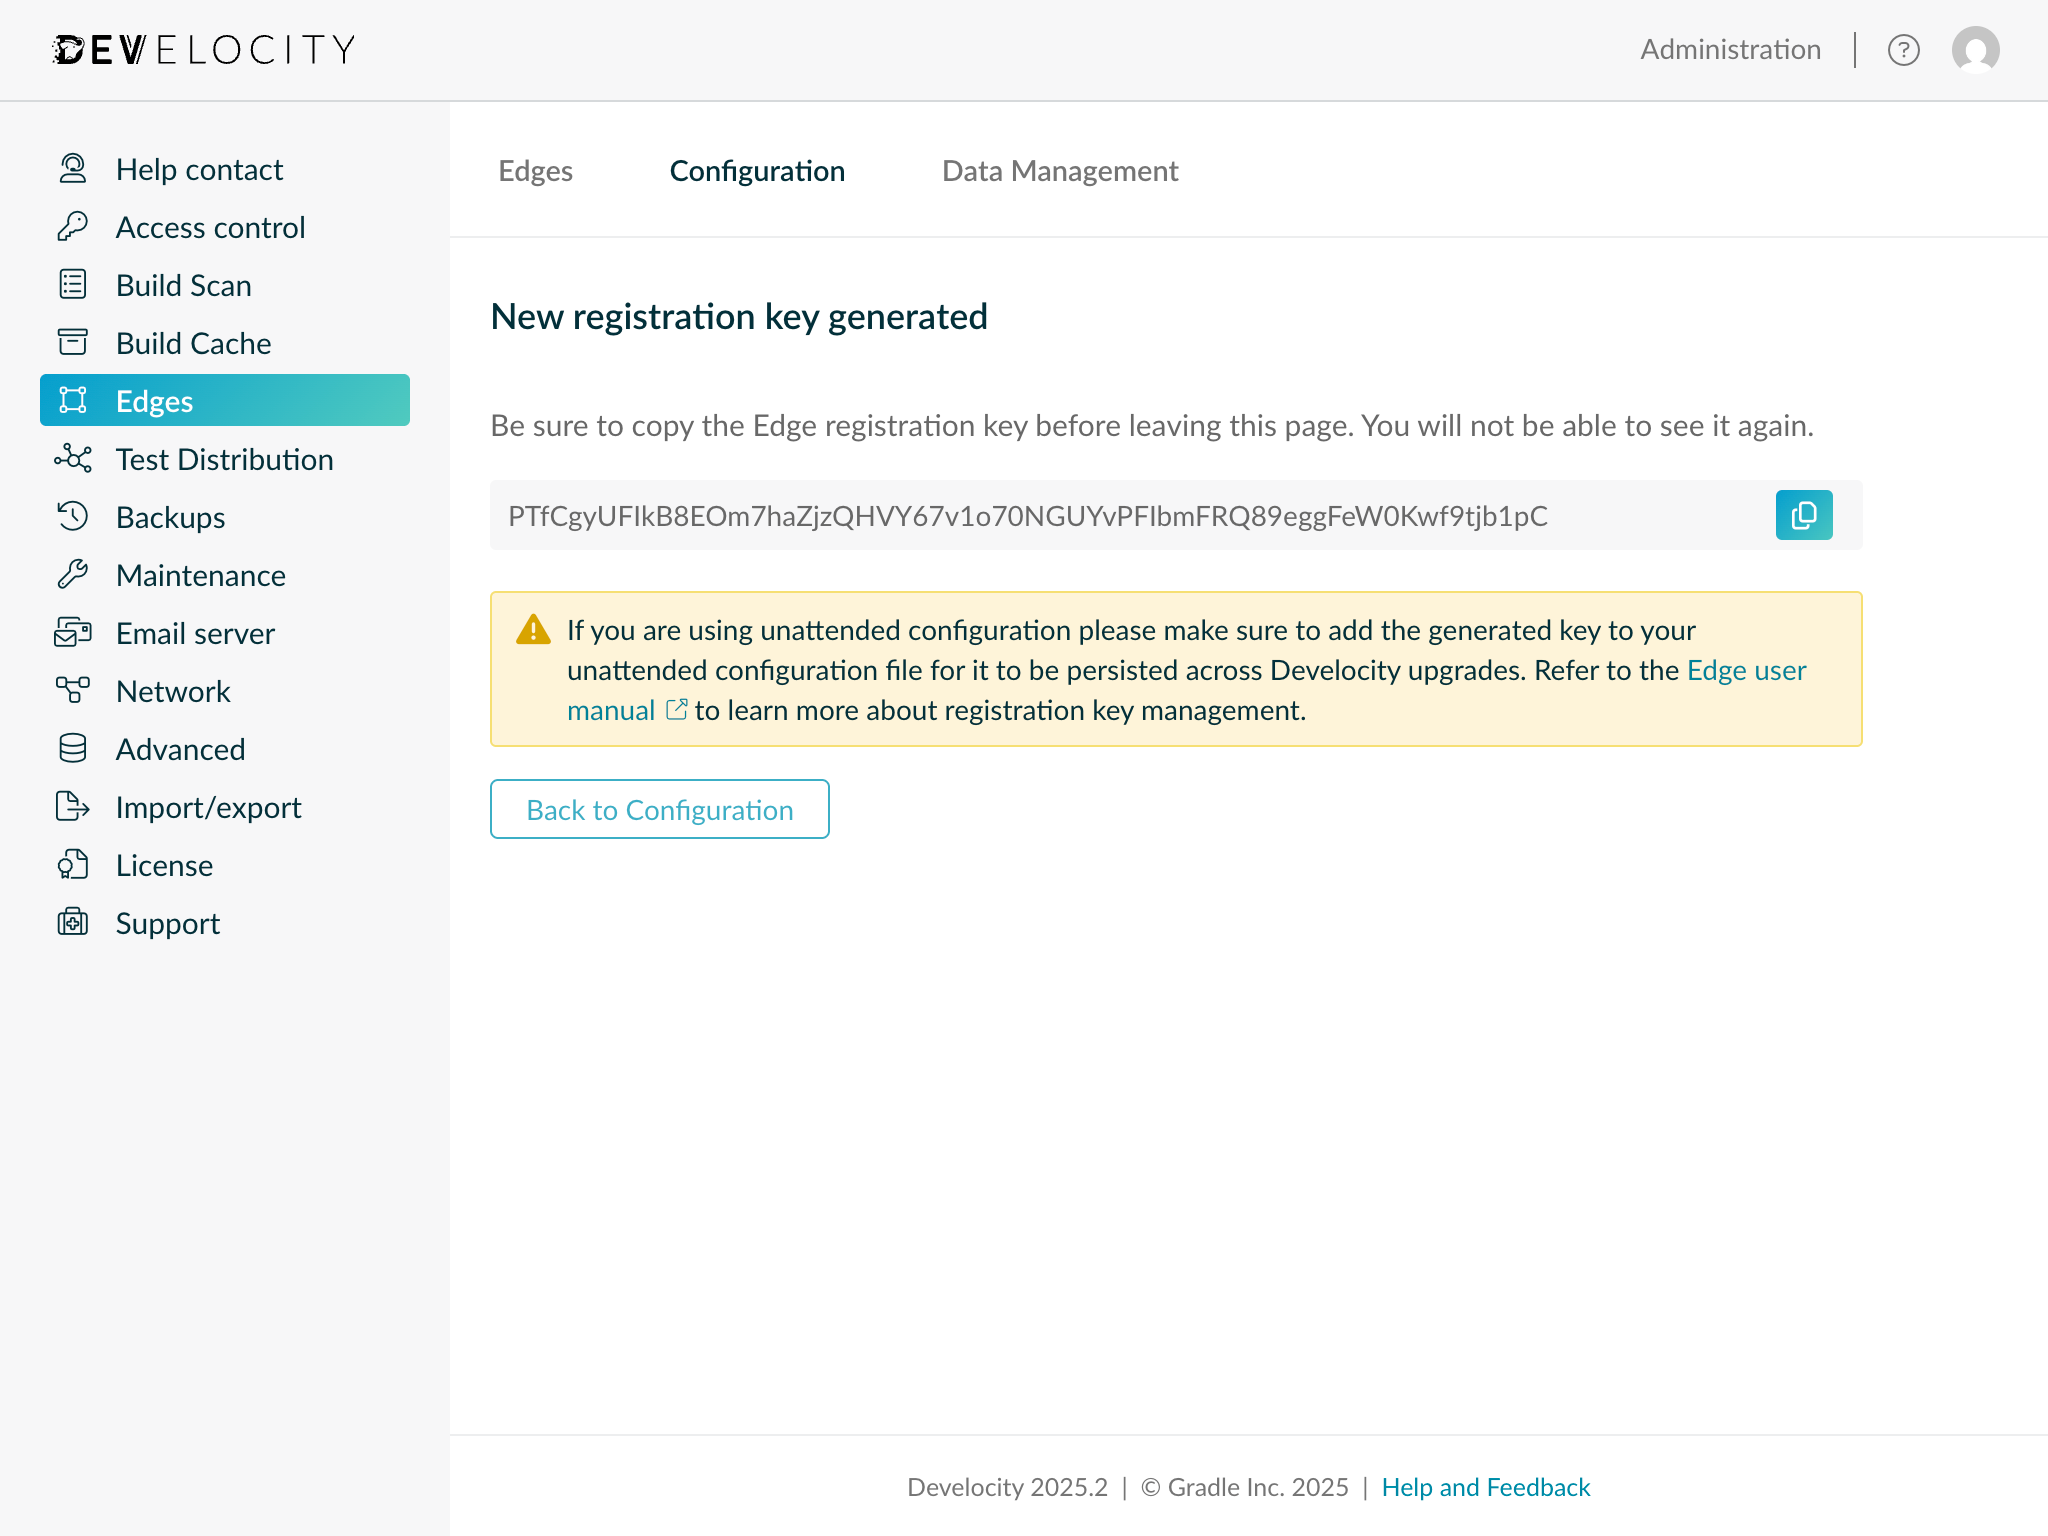 Develocity Edge Key Generation
Creating an Edge
A new Edge can be created by following these steps:
-
Log in to a Develocity instance as a user with "Configure edges" ("Administer Develocity" on pre-2025.4 Develocity instances) permissions.
-
Navigate to .
-
Click Create Edge.
-
Describe the Edge by providing an identifier, public address and the location name.
-
Click Save to finalize creation.
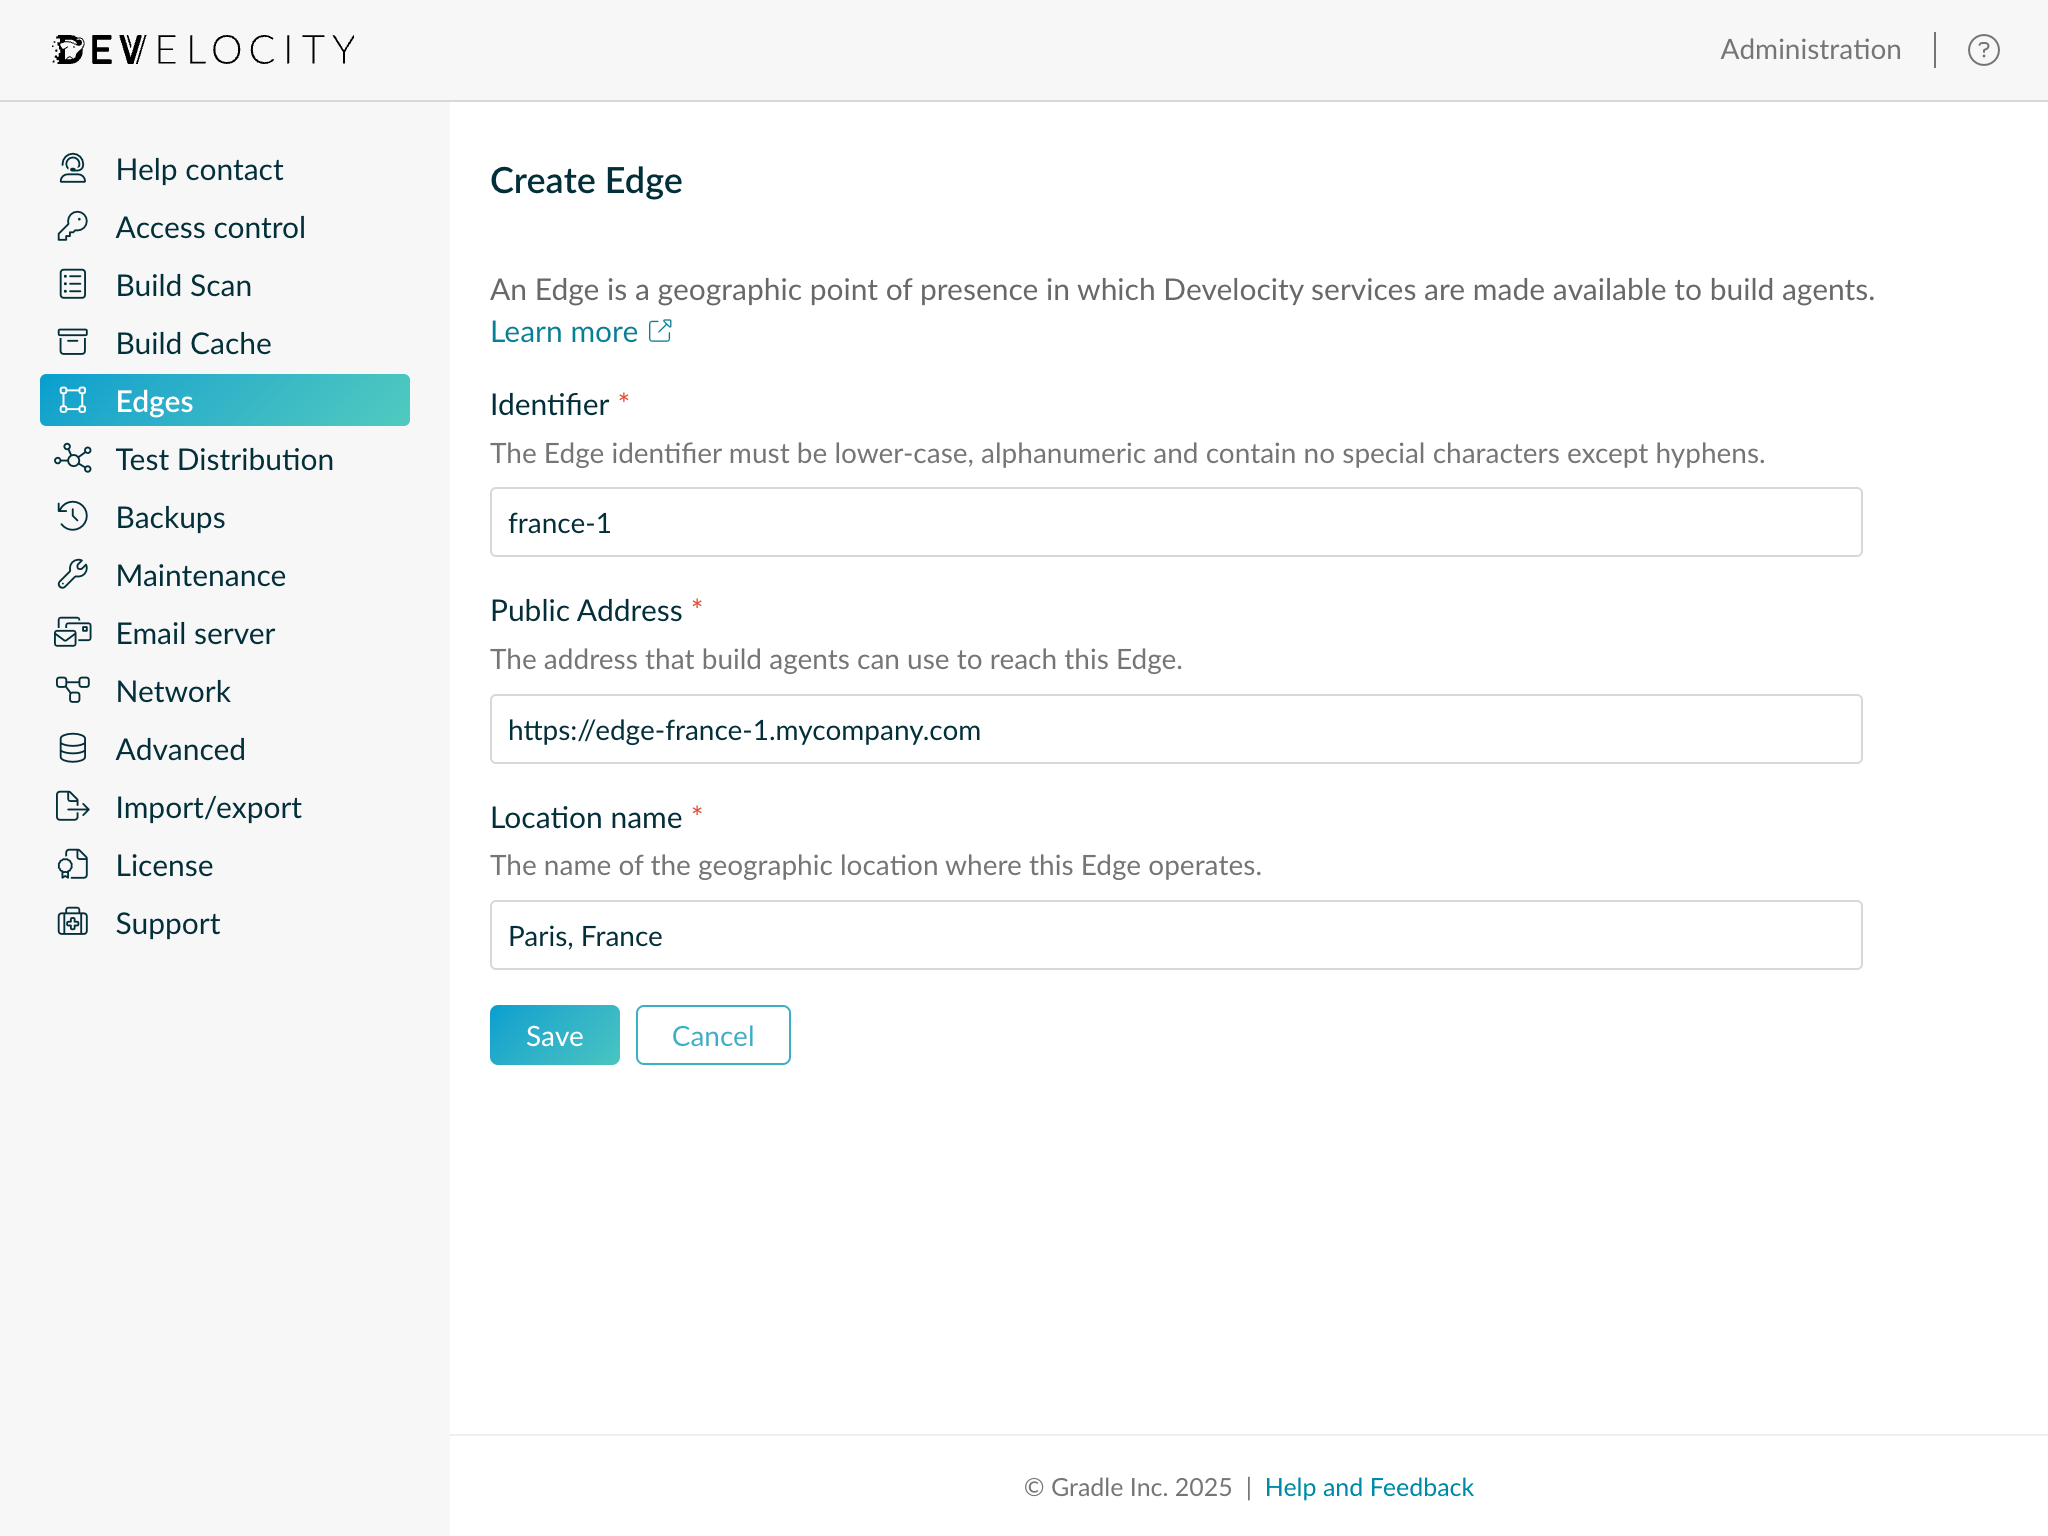 Creating an Edge Node
Editing an Edge
An existing Edge can be edited by clicking on it from the Edges Administration page.
Only the location name and public address fields can be modified.
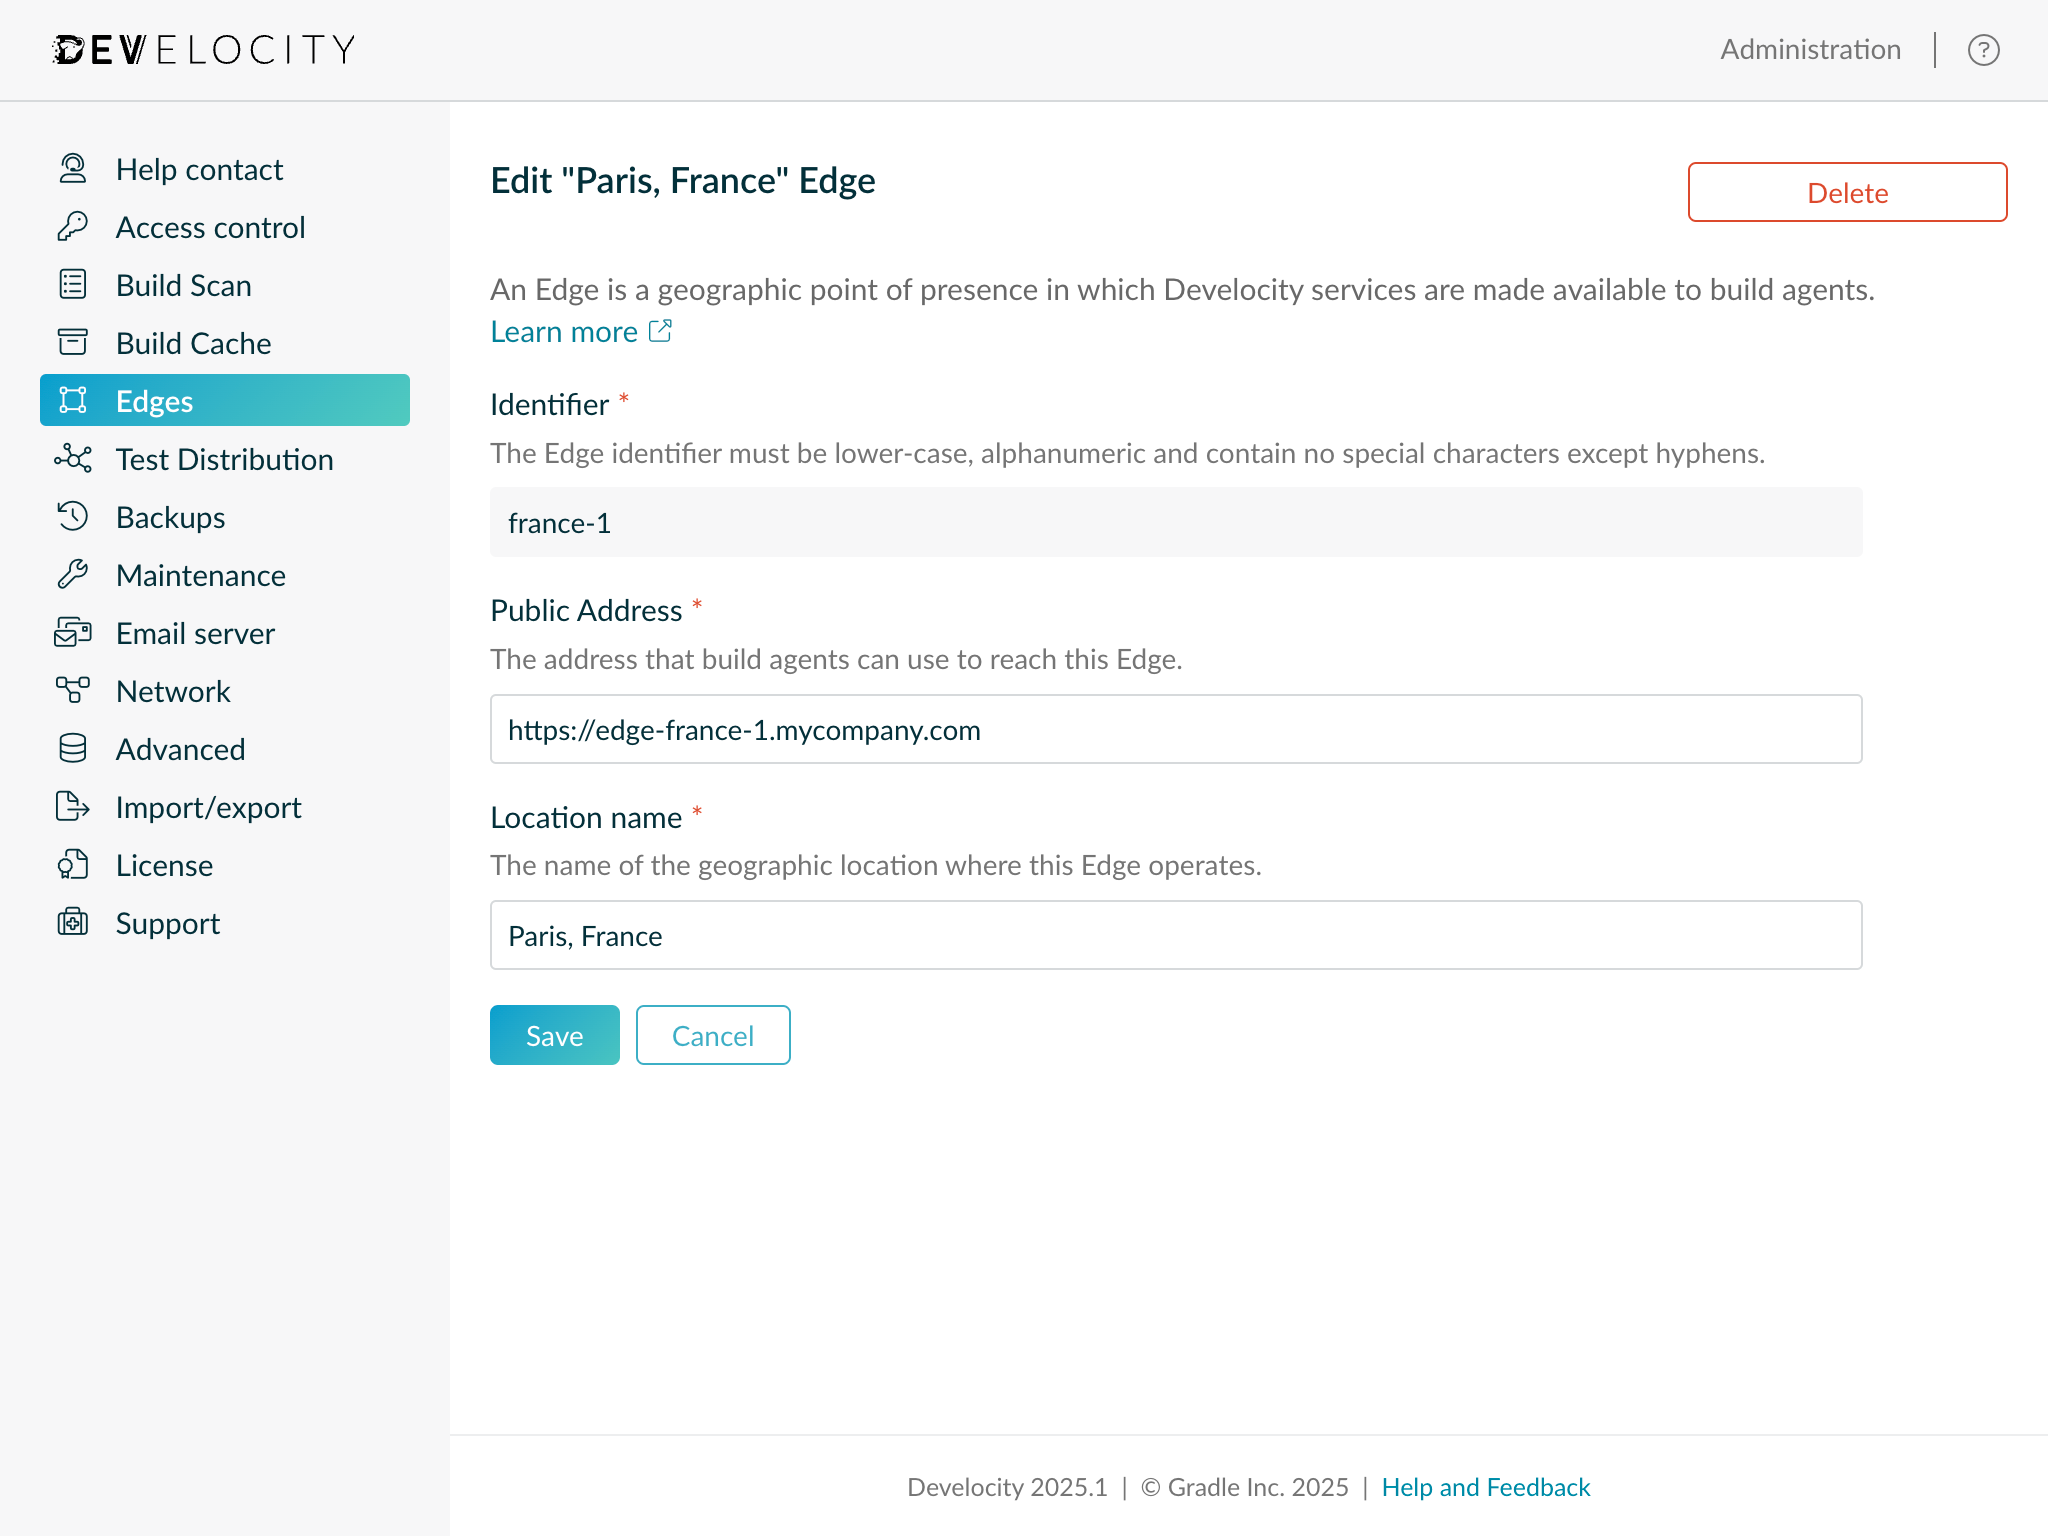
| For the co-located Develocity Edge, only the location name can be modified. |
Deleting an Edge
From the "Edit Edge" page the Delete button can be used to permanently delete the Edge.
Setting the Develocity Server Location Name
Develocity server is itself considered an Edge (as it provides Develocity services) and has a location name associated with it. By default, the location name isn’t meaningful and should be changed by a user with "Configure edges" ("Administer Develocity" on pre-2025.4 Develocity instances) permissions.
The default name can be changed by clicking on the "Develocity" Edge entry listed on the page and editing the "Location name" field.
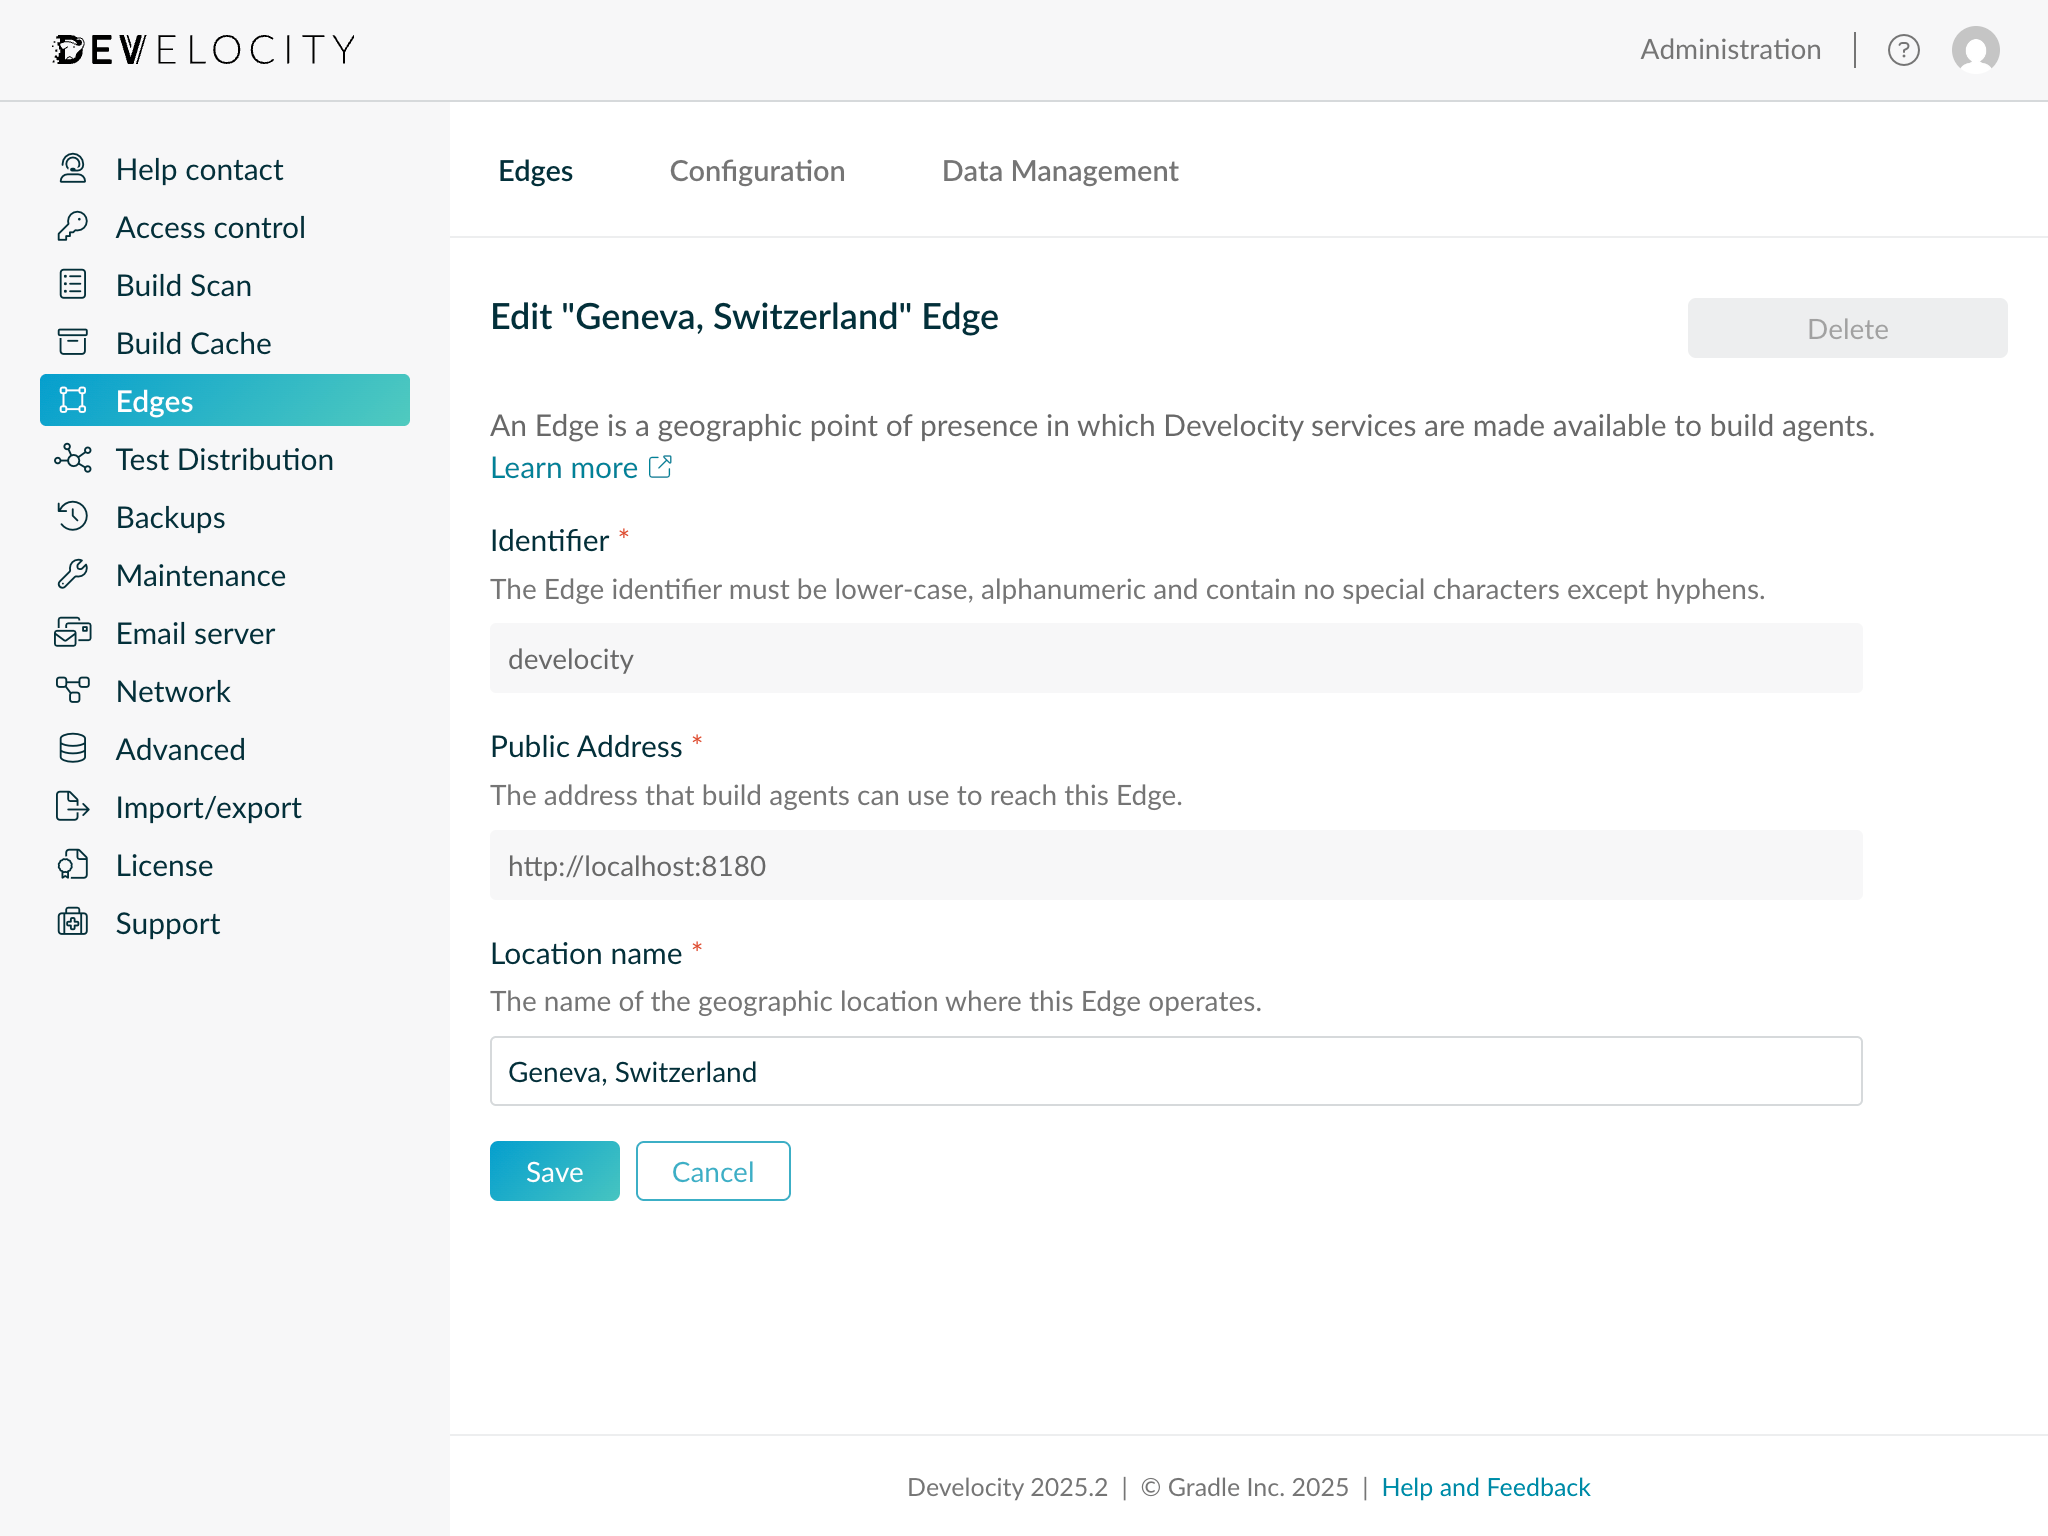
Purging Build Data from Edges
Build data can be purged from across all Edges by clicking into the Data Management tab on the page.
To request that a build data artifact be purged, the fingerprint of the build data - for example, the fingerprint of a Build Cache entry - should be input and the project to which it belongs selected.
| Only users with the "Configure edges" ("Administer Develocity" on pre-2025.4 Develocity instances) AND "Configure projects" permission can purge build data associated with a project. Users with only "Configure edges" permission can only purge build data associated with no project (i.e., "Anonymous"). |
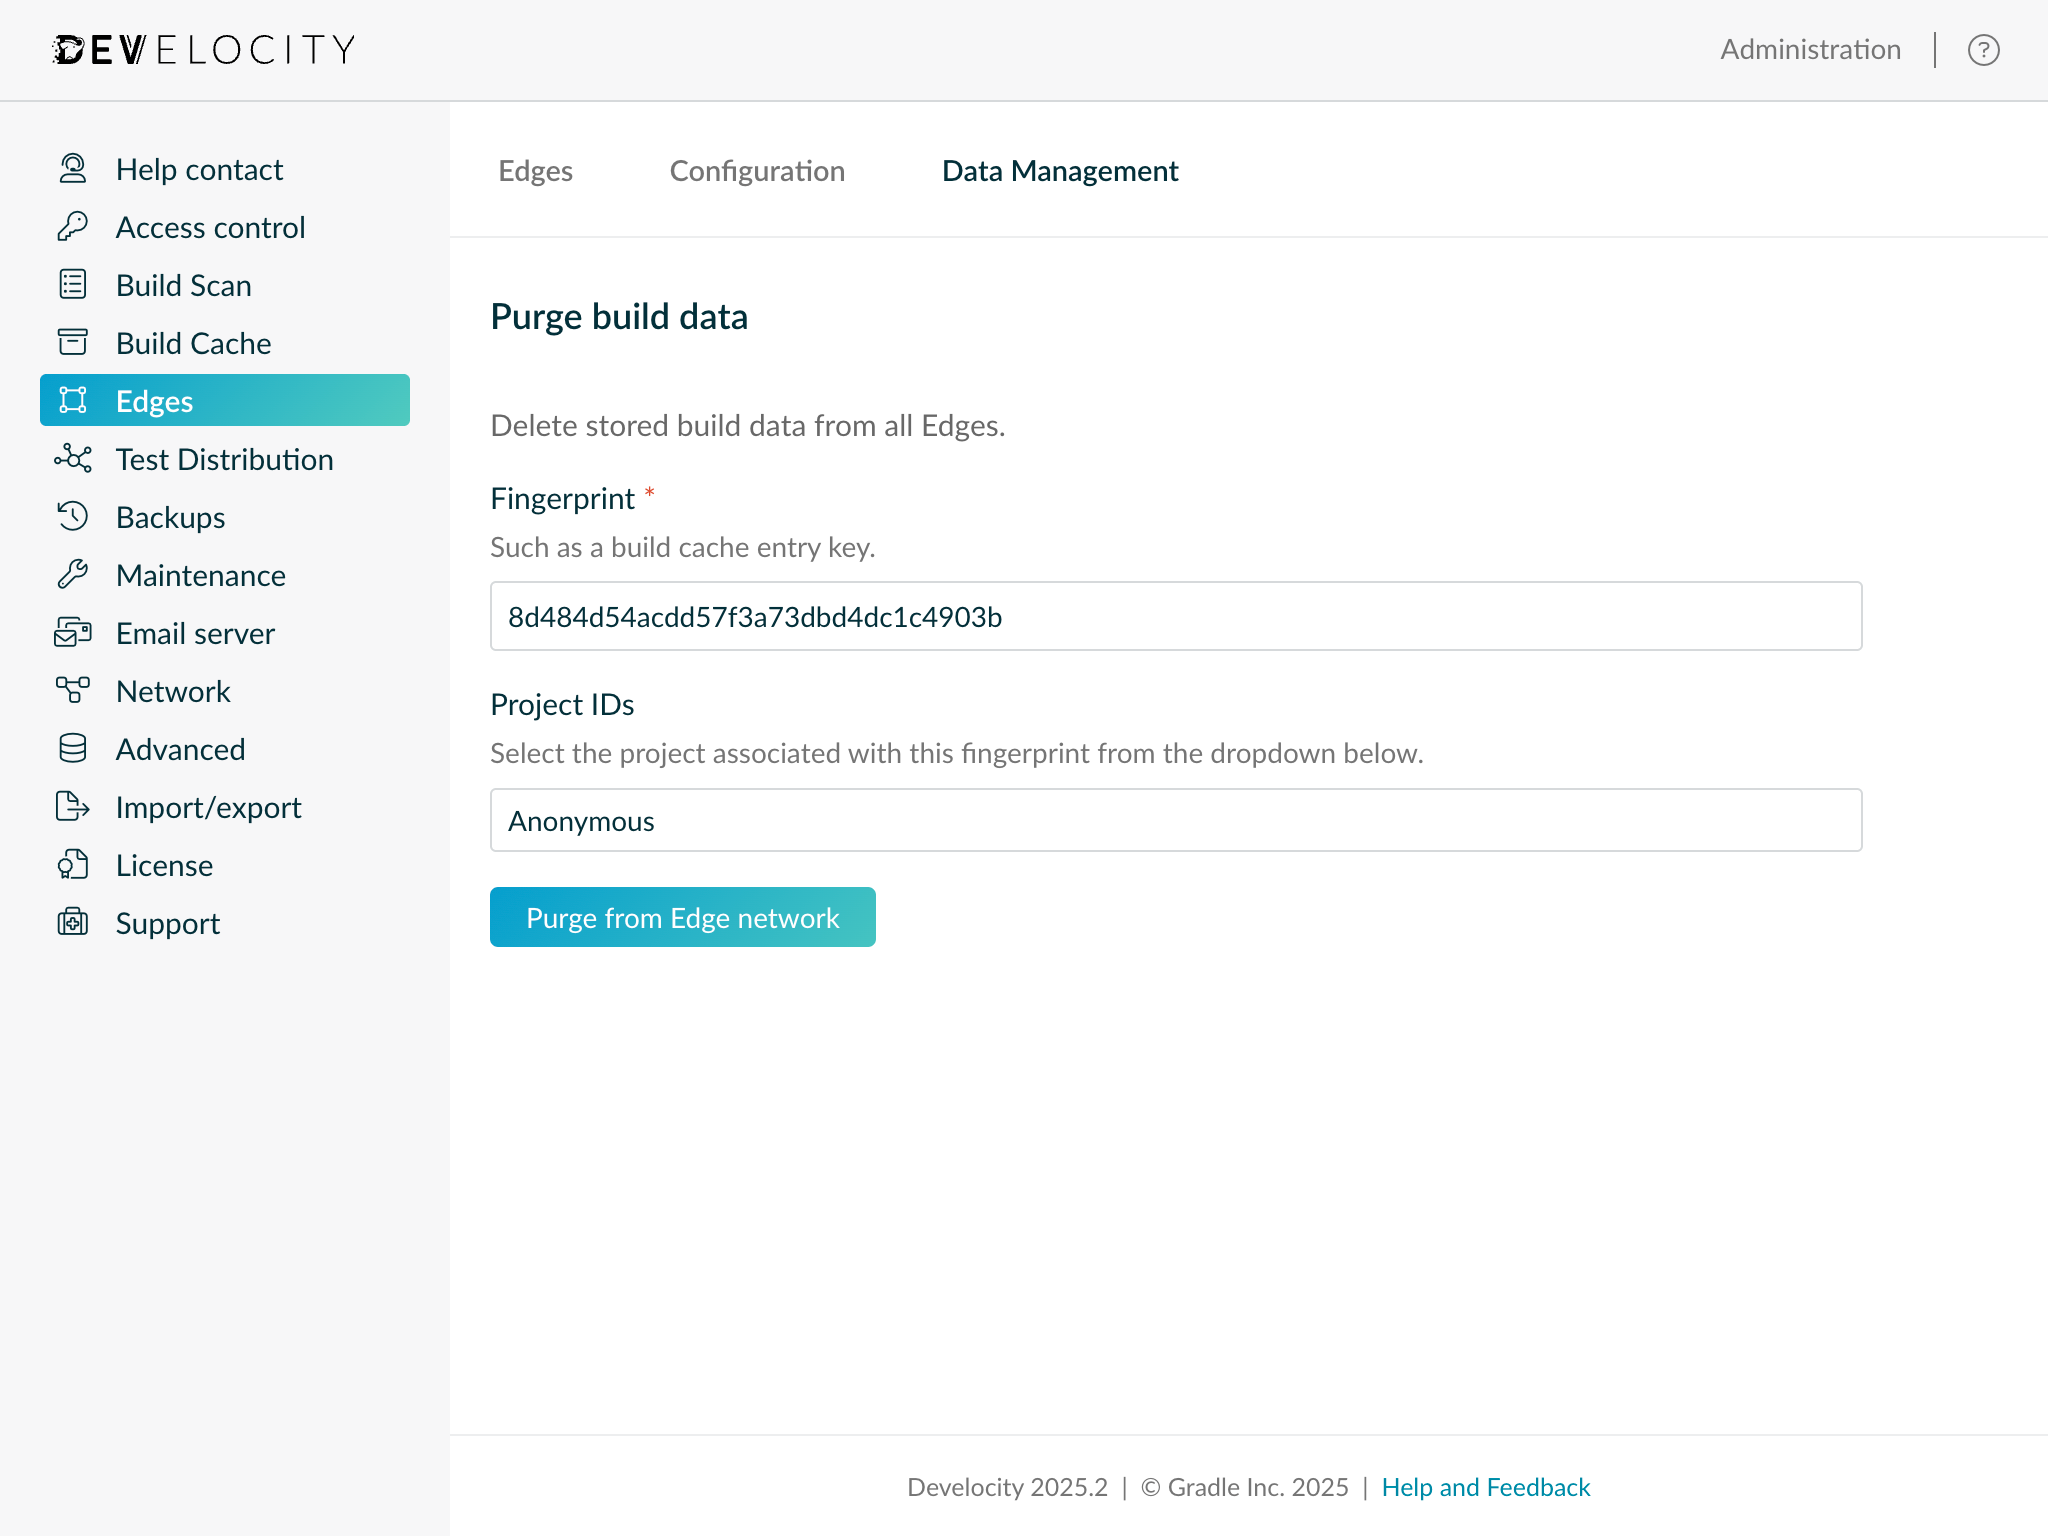
Unattended Configuration
Unattended configuration can also be used to manage registration keys and describe one or more Edges.
| It’s advised to first review the Edge administration using the Administration page section of the user manual to learn the concepts and terminology used by Develocity for administering Edges. |
Managing Edge Registration Keys
Adding an Edge Registration Key
To add a new Edge registration key:
-
Download the latest release of the develocityctl.
-
Execute the Develocity CLI with the
config-file hashoption. -
When prompted, provide a securely random string value as the input. This is considered the registration key. Store the input string securely as it will be passed as an argument when starting Edge nodes to authenticate with Develocity (see Setting the Edge Registration Key).
-
The output from the
config-file hashcommand should be pasted in the list of registration keys, to thehashedKeyfield. -
As
keyPrefixprovide the first few characters of the securely random string input todevelocityctlin Step 3. This can help to identify the registration key when reviewing Edge node configuration. -
In the
titlefield specify a meaningful alias which the key will be referred to by Develocity administrators and operators.
For example, given the random string PTfCgyUFIkB8EOm7McnnZhEX7rVHAOv, the edge unattended configuration file would look like the following:
edge:
  registrationKeys:
    - title: My new registration key
      keyPrefix: PTfCgyU
      hashedKey: 2yHwf1ijC+XEBm3FYno3UHDlQHtV7UWeKxWhsCBzeXc=:TJu44NcOb9nlkqlRQmXw+/DY0lNngiGVda5fuBKHEE78RxrGW+Pujl1Rtk5fe2fg5Xphx3YOsRyPxKbJQFmKKw==
Multiple registration keys can be added to the registrationKeys list as follows:
edge:
  registrationKeys:
    - title: APAC
      keyPrefix: PTfCgyUFIkB8EOm7
      hashedKey: 2yHwf1ijC+XEBm3FYno3UHDlQHtV7UWeKxWhsCBzeXc=:TJu44NcOb9nlkqlRQmXw+/DY0lNngiGVda5fuBKHEE78RxrGW+Pujl1Rtk5fe2fg5Xphx3YOsRyPxKbJQFmKKw==
    - title: EMEA
      keyPrefix: 3xP2tt3FpCYwPDgu
      hashedKey: A0oEl6IayV7XAQuLDeUjIsB58pIy7Mgk3T4eXe5JRbs=:aMWh4YeMVYgiAgw9CTBPNeO600oE+pruc6lwf8LXhwyk+gvjP2FKt5jLT+pT5tNKEdpxMh7bkTTk6L/npOjNFg==
Revoking an Edge Registration Key
To revoke an existing Edge registration key:
-
Remove the key being revoked from the list of registration keys (
registrationKeys) in the unattended configuration file. -
Import the configuration file to Develocity server.
-
Apply the change, restarting Develocity if necessary.
Setting the Develocity Server Location Name
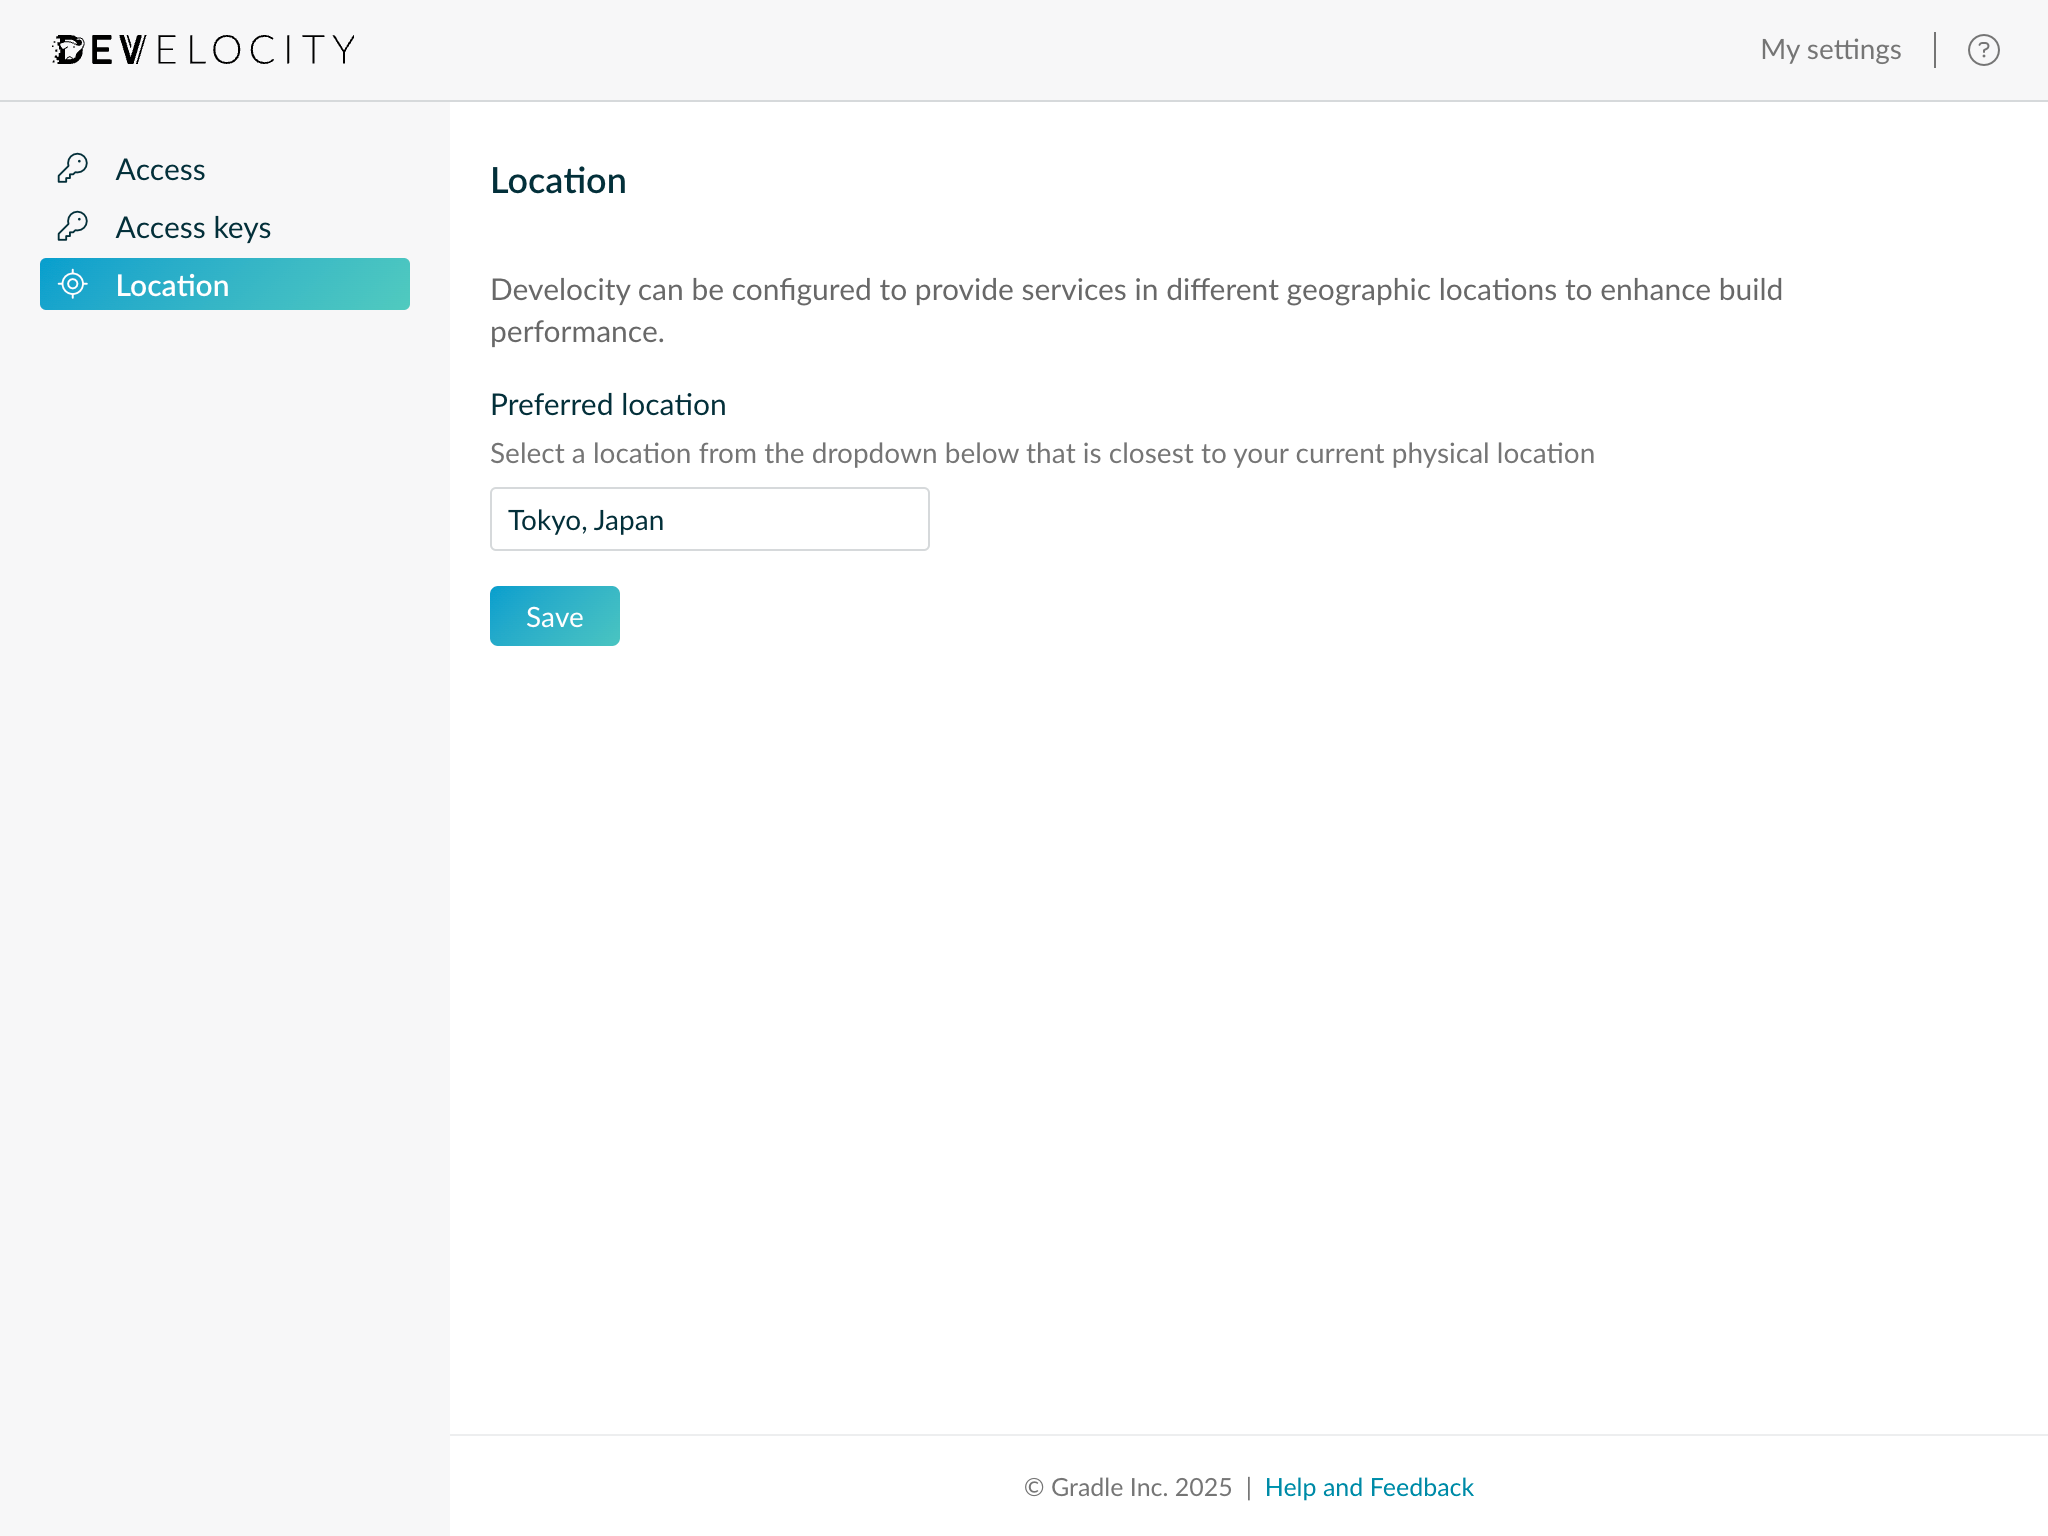
A custom location name can be set for the Develocity server location by setting a value for develocityLocationName.
edge:
  develocityLocationName: Tokyo, Japan
This location name will represent Develocity in the "Preferred location" dropdown for Develocity users in the "Location" tab of the "My Settings" page.
Creating Edges
One or more Edges can be created using the unattended configuration file by providing an identifier, location name and public address for each Edge.
| Changing the identifier for an existing Edge doesn’t update it, instead overwriting the existing one. Edge nodes that previously connected using the old identifier will fail to register for the Edge at that location. |
edge:
  edges:
    - identifier: croatia-1
      locationName: Zagreb, Croatia
      publicAddress: https://edge-croatia-1.example.com
    - identifier: poland-1
      locationName: Warsaw, Poland
      publicAddress: https://edge-poland-1.example.com
Every Edge replicates by default.
To create one with replication turned off, add replicationEnabled: false to its entry.
The field applies only at creation.
To change replication for an existing Edge, use the Enable Replication checkbox on the "Edit Edge" page.
See Disabling Replication for what that turns off and when it is worth doing.
Removing Edges
To remove an Edge, remove the Edge from the list of Edges in the unattended configuration file.
For example, the state of configuration having deleted the Edge with identifier croatia-1 from the example in Creating Edges:
edge:
  edges:
    - identifier: poland-1
      locationName: Warsaw, Poland
      publicAddress: https://edge-poland-1.example.com
Installing Edge Nodes
Setting the Edge Registration Key
Edge nodes authenticate with Develocity server using an Edge registration key.
The registration key must be provided to the Edge node application at startup by setting the EDGE_REGISTRATION_KEY environment variable.
| Registration keys can be generated using the Develocity Administration page. Please refer to the Adding an Edge Registration Key section of the user manual for a step-by-step guide. |
To do so safely when opting to install an Edge node via Docker or run a node using a JAR file,
it’s advisable to create a .env file declaring via environment variables the Edge registration key and other start-up parameters.
EDGE_DEVELOCITY_SERVER=https://develocity.example.com
EDGE_IDENTIFIER=valid-edge-id
EDGE_REGISTRATION_KEY=A1b2C3d4...
EDGE_NODE_TARGET_SIZE=25Gi
This file can then be sourced at the time of executing the Edge node application.
Docker
Specify the path to the .env file using the --env-file option.
docker run --detach \
    --volume /opt/edge-node:/data \
    --publish 5071:5071 \
    --env-file /path/to/edge-node.env \
    gradle/edge-node:2.3.0 \
    start
JAR
1. Create a start-up script that loads the environment variables before running the Edge node. The example script below is for Bash shell.
#!/bin/bash

EDGE_NODE_ENV_FILE_PATH="$1"

if [ -f "$EDGE_NODE_ENV_FILE_PATH" ]; then
    set -a
    source "$EDGE_NODE_ENV_FILE_PATH"
    set +a
fi

java -jar edge-node-2.3.0.jar start
2. Change permissions of the script to make it executable and run the script.
chmod +x ./edge-node.sh
./edge-node.sh "/path/to/edge-node.env"
Kubernetes
Kubernetes users should refer to the Kubernetes section to learn how to apply the Edge registration key as a secret.
Docker
Installation
With Docker installed, an Edge node can be started as follows:
docker run --detach \
    --volume /opt/edge-node:/data \
    --publish 5071:5071 \
    --env-file /path/to/edge-node.env \
    gradle/edge-node:latest \
    start
It’s assumed that the mandatory start-up parameters are provided in the .env file. Refer to the Setting the Edge Registration Key section to learn more.
|
This will download the latest version of the Edge node container image, create a new container from it, then run it with the UID of the current user.
The Edge node will use /opt/edge-node on the host to store its files and serve on ports 5071.
Once connected to Develocity server at https://develocity.example.com, the node will be associated with the Edge identified by valid-edge-id.
More information about changing these settings can be found in the following sections.
Airgapped Installation
In order to install the Docker Edge node on a host that’s not connected to the Internet (i.e. airgapped), you will need to first obtain the image on an Internet connected host, then transfer it to the airgapped destination.
-
On the non-airgapped system, pull down the latest docker image for the node
docker pull gradle/edge-node:2.3.0 -
Export the image to a file
docker save gradle/edge-node:2.3.0 --output edge-node.tar -
Copy this file across to the airgapped host, and then import the image into docker
docker load --input edge-node.tar
The node can then be started and configured on the airgapped host in the same manner as a non-airgapped install.
Versioning
The docker latest tag always refers to the most recently released version of the Edge node, however we recommend using an absolute version when using Docker, as latest may give unexpected results when upgrading due to Docker idiosyncrasies.
Binding the Data Directory
The Edge node container uses /data inside the container as the application data directory.
When starting the container, the --volume (or -v) switch should be used to specify which directory on the host to mount to this directory in the container.
If the container is started without a mount for /data, Docker will create a directory on the host in a location of its choosing to use.
The anonymous volume won’t be reused between container runs, losing any persisted Edge node data.
|
Each Edge node must have its own data directory.
Sharing a data directory across nodes is not supported.
When choosing where to store the data (i.e. which host directory to mount to /data within the container),
be sure to choose a disk volume that has adequate storage capacity to accommodate the desired storage size.
| For more information on managing data volumes with Docker, please see this tutorial. |
Run-as User
The Edge node Docker image specifies a default user.
If you want to use a different user ID known to the host, you can pass the argument --user $UID with the required user ID.
The command below demonstrates using a user ID of 5000:
docker run --detach \
    --user 5000 \
    --volume /opt/edge-node:/data \
    --publish 5071:5071 \
    --env-file /path/to/edge-node.env \
    gradle/edge-node:2.3.0 \
    start
The Edge node application will read from and write to the file system as this user.
The /data directory mount must be readable and writable by this user.
Port Mapping
The Edge node container must expose the port 5071 for build tool connectivity (see also Network)
These ports need to be mapped to a port on the host in order to expose it.
The following example exposes the HTTP and gRPC build tool interfaces (Gradle, Maven, sbt and Bazel) via port 8443 on the host:
docker run --detach \
    --volume /opt/edge-node:/data \
    --publish 8443:5071 \
    --env-file /path/to/edge-node.env \
    gradle/edge-node:2.3.0 \
    start
Auto Start
The Edge node container can be automatically restarted on system boot
by leveraging Docker’s restart policies.
Starting a node container with --restart always will ensure that it’s always running
unless explicitly stopped.
docker run --detach \
    --volume /opt/edge-node:/data \
    --publish 5071:5071 \
    --restart always \
    --env-file /path/to/edge-node.env \
    gradle/edge-node:2.3.0 \
    start
Kubernetes
Below is a sample Kubernetes manifest for deploying Edge nodes to a Kubernetes cluster.
An ephemeral volume is mounted to bind the data directory to, and the requested storage should be sized appropriately for the target storage size. You may also need to adjust the allocated CPU and memory resources based on-demand and the resources of your cluster.
This Kubernetes manifest also enables peering between Edge nodes in the cluster by default.
apiVersion: v1
kind: Service
metadata:
  name: edge-node
spec:
  selector:
    app.kubernetes.io/part-of: develocity
    app.kubernetes.io/component: edge-node
  ports:
  - name: http
    port: 5071
---
apiVersion: v1
kind: Service
metadata:
  name: edge-node-headless
spec:
  clusterIP: None
  selector:
    app.kubernetes.io/part-of: develocity
    app.kubernetes.io/component: edge-node
  ports:
  - name: http
    port: 5071
---
apiVersion: apps/v1
kind: Deployment
metadata:
  name: edge-node
  labels:
    app.kubernetes.io/part-of: develocity
    app.kubernetes.io/component: edge-node
spec:
  replicas: 3 # Change this to the desired number of replicas
  selector:
    matchLabels:
      app.kubernetes.io/part-of: develocity
      app.kubernetes.io/component: edge-node
  strategy:
    type: RollingUpdate
    rollingUpdate: # Change the strategy to adapt to the count of replicas
      maxUnavailable: 25%
      maxSurge: 25%
  template:
    metadata:
      labels:
        app.kubernetes.io/part-of: develocity
        app.kubernetes.io/component: edge-node
    spec:
      securityContext:
        runAsUser: 65532
        runAsGroup: 65532
        fsGroup: 65532
        fsGroupChangePolicy: OnRootMismatch
        runAsNonRoot: true
      terminationGracePeriodSeconds: 600
      containers:
      - name: edge-node
        image: gradle/edge-node:2.3.0
        args: [ "start" ]
        ports:
        - name: http
          containerPort: 5071
        resources:
          requests:
            memory: 2Gi
            cpu: "2"
          limits:
            memory: 4Gi
            cpu: "2"
        env:
        - name: EDGE_DEVELOCITY_SERVER
          value: http://develocity-app:6011 # Change this to your Develocity server URL
        - name: EDGE_IDENTIFIER
          value: my-edge-1 # Change this identifier to an Edge created in your Develocity installation
        - name: EDGE_REGISTRATION_KEY
          valueFrom:
            secretKeyRef:
              name: develocity-edge-registration-secret
              key: registration-secret
        # This enables the Edge node to peer with other Edge nodes.
        # Assumes there will be more than one Edge nodes in the cluster.
        - name: EDGE_PEERING_ENABLED
          value: "true"
        # Change to "true" for peering over a secure channel,
        # if the Edge node is configured to import certificates
        # and serve data over HTTPS.
        - name: EDGE_PEERING_TLS
          value: "false"
        volumeMounts:
        - mountPath: /data
          name: edge-node-ephemeral-volume
      volumes:
      - name: edge-node-ephemeral-volume
        ephemeral:
          volumeClaimTemplate:
            spec:
              accessModes: [ "ReadWriteOnce" ]
              resources:
                requests:
                  storage: 25Gi # The Edge node uses as much storage as requested to store data
Adding the Registration Key as a Secret
Use the following kubectl command to create the secret named develocity-edge-registration-secret within the desired namespace. Replace <develocity-edge-namespace> with the actual namespace:
kubectl -n <develocity-edge-namespace> apply -f ./edge-registration-secret.yamlapiVersion: v1
kind: Secret
type: Opaque
metadata:
name: develocity-edge-registration-secret
namespace: <develocity-edge-namespace>
stringData:
registration-secret: "dmVyc2lvbjogNQpyZWdpc3RyYXRp...." # Change to actual registration key from DevelocityExposing Edge Nodes Outside Your Cluster
The sample Kubernetes manifest includes a service for the Edge node named edge-node exposing port 5071.
This service uses a ClusterIP for communication meaning it’s not accessible outside of the Kubernetes cluster by default.
To access the Edge node outside your cluster you will need to create some kind of entry-point to this service into the cluster.
Possible methods for this are via an ingress, explicit node port, external IP service or a load balancer. The method you choose depends on your cluster and network configuration.
Below is a sample Ingress definition:
apiVersion: networking.k8s.io/v1
kind: Ingress
metadata:
  name: edge-ingress
spec:
  tls:
  - hosts:
    - YOUR_DOMAIN_NAME
    secretName: YOUR_TLS_SECRET_NAME
  rules:
  - host: YOUR_DOMAIN_NAME
    http:
      paths:
      - path: /
        pathType: ImplementationSpecific
        backend:
          service:
            name: edge-node
            port:
              name: http
Deploying with Network Policies
When Develocity is installed with network policies enabled (networkPolicies.enabled in the Develocity Helm values), the Develocity chart applies a policy that selects every pod in its namespace and restricts egress to DNS traffic only.
An Edge node deployed into that namespace is subject to this restriction and cannot reach Develocity, object storage, or its Edge peers until an additional policy allows its egress traffic.
Apply the following NetworkPolicy alongside the Edge node manifest when deploying into a namespace where the Develocity network policies are active:
apiVersion: networking.k8s.io/v1
kind: NetworkPolicy
metadata:
  name: edge-node-egress
spec:
  podSelector:
    matchLabels:
      app.kubernetes.io/part-of: develocity
      app.kubernetes.io/component: edge-node
  policyTypes:
  - Egress
  egress:
  - {} # Allows all egress; restrict to your Develocity server, object storage, and Edge peers as required
The policy allows all egress from the Edge node pods. It can be tightened to the specific destinations of your installation: the Develocity server, the object storage endpoint, and the Edge node peers. Inbound traffic to the Edge node pods doesn’t require an additional policy, and the Develocity chart’s own policies already accept inbound Edge node traffic to the Develocity application.
JAR
Running an Edge Node
Once you have downloaded the JAR file, refer to the Setting the Edge Registration Key section to learn how to set the Edge registration key used to authenticate with Develocity.
The Edge node application can be run with the java command and the start subcommand, for example:
java -jar edge-node-2.3.0.jar start --develocity-server=https://develocity.example.com --edge-identifier=valid-edge-id --target-size=25GiThis will start an Edge node that’s:
-
Connected to the Develocity server at
https://develocity.example.com. -
Associated with the Edge named
$valid-edge-id. -
Storing operation data to a directory inside the
$TEMPlocation -
Requested to use at most 25 GiB of storage.
Specifying a Custom Data Directory
It’s strongly recommended to specify an explicit data directory location with the --data-dir option:
java -jar edge-node-2.3.0.jar start --data-dir /opt/edge-nodeEach Edge node must have its own data directory.
Sharing a data directory between Edge node instances is not supported.
To use the current directory as the data directory, use --data-dir .
|
Specifying the Ports
The default listening ports are 5071 and 5072 (the latter is reserved for application internal usage).
With regard to the former, to use a different port you can use the --port option:
java -jar edge-node-2.3.0.jar start --port 443 --data-dir /opt/edge-node| Most systems require superuser privileges to bind to a port lower than 1024. |
In the absence of a --port option, the PORT environment variable is also respected.
The Edge node listens for gRPC build tool traffic (used by Bazel) on port 6011 by default.
To use a different gRPC port, use the --grpc-port option:
java -jar edge-node-2.3.0.jar start --grpc-port 6012 --port 443 --data-dir /opt/edge-nodeIn the absence of a --grpc-port option, the EDGE_NODE_GRPC_PORT environment variable is also respected.
The command line argument takes precedence if both are set.
Optimized HTTPS
Edge nodes can use OpenSSL for HTTPS connections, which may provide performance improvements in high-traffic environments on some platforms. The optimization moves SSL/TLS cryptographic operations from the JVM to native OpenSSL libraries.
Optimized HTTPS support is available on the following platforms:
-
Linux (aarch_64/x86_64)
-
macOS (aarch_64/x86_64)
-
Windows (x86_64)
To use OpenSSL optimizations, you must run the Edge node binary using either:
-
The Edge node JAR file directly on the host system
-
A custom Docker image with OpenSSL support (For musl-based Linux environments, the
libc6-compatpackage must be installed, as the native libraries are compiled againstglibc)
The default Edge Docker images (based on bellsoft/liberica-openjdk-alpine-musl) don’t include the necessary OpenSSL libraries.
If HTTPS is configured but OpenSSL support cannot be loaded, Edge node app will emit a warning:
WARNING: Unable to use optimized HTTPS support as OpenSSL was not found.
The Edge node will continue to operate using the JVM’s built-in SSL/TLS implementation.
Auto Start
The Edge node JAR provides no built-in mechanism for auto starting on system restart. This must be implemented with your operating system’s process manager or similar.
The following demonstrates how to use systemd, a popular process manager for Linux systems, to achieve this.
1. Create a file, edge-node.sh as root and make it executable, with the following contents:
#!/bin/bash
# Launches Develocity Edge node with correct arguments
# Should be run with CAP_NET_BIND_SERVICE rather than as the superuser
EDGE_DEVELOCITY_SERVER=https://develocity.example.com
EDGE_IDENTIFIER=valid-edge-id
DEVELOCITY_EDGE_REGISTRATION_KEY=A1b2C3d4...
EDGE_NODE_TARGET_SIZE=25Gi

java -jar /absolute/path/to/edge-node-2.3.0.jar start
2. Create a file, /etc/systemd/system/develocity-edge.service as root, with the following contents:
[Unit]
Description=Develocity Edge
After=network.target
StartLimitIntervalSec=0

[Service]
# To improve security you should create a separate user to run the Edge node
#User=gradle
#Group=gradle
# Allow using ports below 1024, required if not run as the superuser
AmbientCapabilities=CAP_NET_BIND_SERVICE
Restart=always
RestartSec=1
ExecStart=/absolute/path/to/edge-node.sh

[Install]
WantedBy=multi-user.target
3. Run the following to start the Edge node for the first time:
systemctl start develocity-edge4. Run the following to have systemd start the Edge node on system boot:
systemctl enable develocity-edgePost-installation setup
Verify Connectivity
The Edge node has a /ping HTTP endpoint to test connectivity, which can be used to test if it’s reachable for users in general.
For example, if you are running an Edge node locally, without SSL, and are using the default listening port, then you can access this endpoint at http://localhost:5071/ping.
Connectivity to an Edge node can be tested by running the following command on hosts/computers which need to connect:
curl -sw \\n --fail-with-body --show-error https://<edge-node-host>/pingIt should return SUCCESS.
Optimizing Replication with Signed URLs
A prerequisite for configuring Develocity to use signed URLs is that Develocity is connected to either Amazon S3 or Google Cloud Storage.
By configuring Develocity to use signed URLs, Develocity server doesn’t need to act as a proxy for Edges to transfer build data into object storage, reducing load on the server. Signed URLs - also known as pre-signed URLs or Shared Access Signatures - are time-bound, pre-authorized URLs that grant temporary access to an object in storage.
An advanced parameter presignedUrl.enabled must be added to the objectStorage Helm values.
Refer to the examples below for each of the supported object storage types.
|
In Develocity 2026.2 and later, if your object storage configuration defines a separate |
Configuring Peering Between Nodes at an Edge
Develocity Edge nodes in proximity can optionally establish direct communication ("peering") to replicate data between themselves.
When enabled, a set of peered Edge nodes can request and serve artifacts from one another without needing to fetch the same data repeatedly from the central Develocity server or object storage. Peering can help to:
-
Decrease egress bandwidth consumption by reducing the need to replicate data from the Develocity server to each Edge node individually.
-
Minimize latency when accessing data for the first time if it’s not already stored locally on an Edge node.
-
Allow new nodes to bootstrap quickly from local peers in ephemeral or autoscaled node environments.
| Peering is most effective when Edge nodes are deployed within the same low-latency network boundary (e.g., same availability zone or region) to minimize inter-node communication overhead. |
Enabling Peering
Peering between Edge nodes can be initiated by applying CLI options or setting environment variables when starting Edge nodes.
To activate Edge node peering, you must for each Edge node participating in a peering group:
-
Pass the
--peeringflag or set theEDGE_PEERING_ENABLEDenvironment variable totrue. -
Specify the address that peers can use to connect to the Edge node using the
--advertised-addressoption.
By default, peers are discovered using Develocity server. However, it’s possible to use DNS-based discovery instead, which could be preferable in some environments (mainly Kubernetes).
To enable DNS-based discovery instead, you must set the --discovery-strategy option to DNS. The --advertised-address is optional in case of DNS-based discovery with Kubernetes.
If using environment variables to configure an Edge node, the advertised address and discovery strategy can be set using EDGE_ADVERTISED_ADDRESS and EDGE_DISCOVERY_STRATEGY respectively.
When an Edge node cannot find requested build data locally, it queries all of its peers simultaneously and reads the fastest successful response.
Edge node 2.3.0 removed the STATEFUL peering strategy, and peering now always uses the behavior described above.
The --peering-strategy option and its EDGE_PEERING_STRATEGY environment variable are deprecated and ignored.
An Edge node that still sets either one starts normally and logs a warning, so no configuration change is required before upgrading.
|
Securing Communication Between Peers
If peers aren’t in the same trusted network, it’s important to secure communication between them using TLS.
To do so, you must provide the --peering-tls option (or set EDGE_PEERING_TLS environment variable to true) when starting the Edge node.
Additionally, follow the Using HTTPS section to configure each Edge node in the peering group to serve HTTP traffic over TLS.
Increasing Memory Limits
By default, the Edge node uses 2 GiB of heap memory and 500MiB of off heap memory. If you need to allocate more memory, the application can be configured as follows:
| Increasing the available heap memory reduces the Edge node’s direct memory buffer usage and improves request latency and throughput. |
For sustained, high-throughput workloads, the following additional JVM options are recommended to improve garbage collection behavior and network throughput:
| Option | Description |
|---|---|
|
Enable the generational Z Garbage Collector for low, predictable pause times. |
|
Pre-touch heap pages at startup so memory is committed up front, avoiding latency spikes when serving the first requests. |
|
Increase the HTTP/2 connection and stream flow-control window sizes to 16 MiB to improve throughput for large artifact transfers. |
The Edge Docker image applies these performance options (the Z Garbage Collector, -XX:+AlwaysPreTouch, and the increased HTTP/2 window sizes) by default, so the Docker and Kubernetes examples below set only the memory limits.
Any value you provide in JAVA_OPTS overrides the corresponding default.
When running the JAR directly, include the performance options yourself, as shown in the JAR example.
Docker
The value for heap and off heap memory is set using an environment variable called JAVA_OPTS in the docker run instruction.
docker run --detach \
    --volume /opt/edge-node:/data \
    --publish 5071:5071 \
    --env JAVA_OPTS="-Xms3g -Xmx3g -XX:MaxDirectMemorySize=1g" \
    gradle/edge-node:2.3.0 \
    start
Kubernetes
The value for heap and off heap memory is set using an environment variable called JAVA_OPTS for the container in the Kubernetes manifest.
It’s important that the container resources are also adjusted accordingly.
containers:
  - name: edge-node
    args: ["start"]
    env:
      - name: JAVA_OPTS
        value: "-Xms3g -Xmx3g -XX:MaxDirectMemorySize=1g"
    resources:
      requests:
        memory: 3Gi
      limits:
        memory: 6Gi
JAR
The value for heap and off heap memory is set using the standard JDK parameters when running the JAR.
java -Xms3g -Xmx3g -XX:MaxDirectMemorySize=1g -XX:+UseZGC -XX:+ZGenerational -XX:+AlwaysPreTouch -Dcom.linecorp.armeria.defaultHttp2InitialConnectionWindowSize=16777216 -Dcom.linecorp.armeria.defaultHttp2InitialStreamWindowSize=16777216 -jar edge-node-2.3.0.jar startLogging
The logs for an Edge node are located in the «data-dir»/logs directory.
Logs are automatically rotated.
The latest log file is named node.log (the latest log file is always «data-dir»/logs/node.log).
Monitoring
Edge node exposes the following endpoints on the monitoring port (9090):
| Endpoint | Description |
|---|---|
|
Liveness probe. Returns |
|
Readiness probe. Returns |
|
Deprecated in favor of |
|
Deprecated in favor of |
|
Application metrics in Prometheus format. |
Metrics
Prometheus metrics exposed by an Edge node.
Note: DistributionSummary is a combination of Summary and a Gauge that tracks the maximum value (with a _max metric name suffix).
| Metric Name | Type | Description |
|---|---|---|
|
DistributionSummary |
Total data served (in bytes). |
|
DistributionSummary |
Total data submitted (in bytes). |
|
Counter |
Artifact Cache CLI download requests, tagged with the asset |
|
Counter |
Download requests forwarded to Develocity, tagged with the asset |
|
Counter |
Seeding requests, tagged with the asset |
|
Counter |
Cached Artifact Cache CLI files evicted to keep the assets folder within its budget. |
|
Gauge |
Current size of the assets folder on this Edge node’s local disk. |
|
Gauge |
Active requests currently handled by the service. |
|
DistributionSummary |
Duration of request (in seconds) |
|
DistributionSummary |
Length of the request content (in bytes). |
|
Counter |
Number of handled requests. |
|
DistributionSummary |
Duration of response (in seconds) |
|
DistributionSummary |
Length of the response content (in bytes). |
|
Counter |
Handled service timeouts. |
|
DistributionSummary |
Service duration (since request processing started until response processing ended). |
|
- |
JVM metrics provided by Micrometer |
|
- |
System metrics provided by Micrometer. |
Dashboard
You can visualize Edge node metrics with Edge Node Grafana dashboard.
The dashboard displays interface metrics for Setup Cache, Artifact Cache and Build Cache:
-
Throughput, Latency and Errors (The RED Method metrics)
-
Bandwidth utilization, including served and submitted data volume and traffic distribution
-
Service responses grouped by outcome (success/failure) and HTTP response code
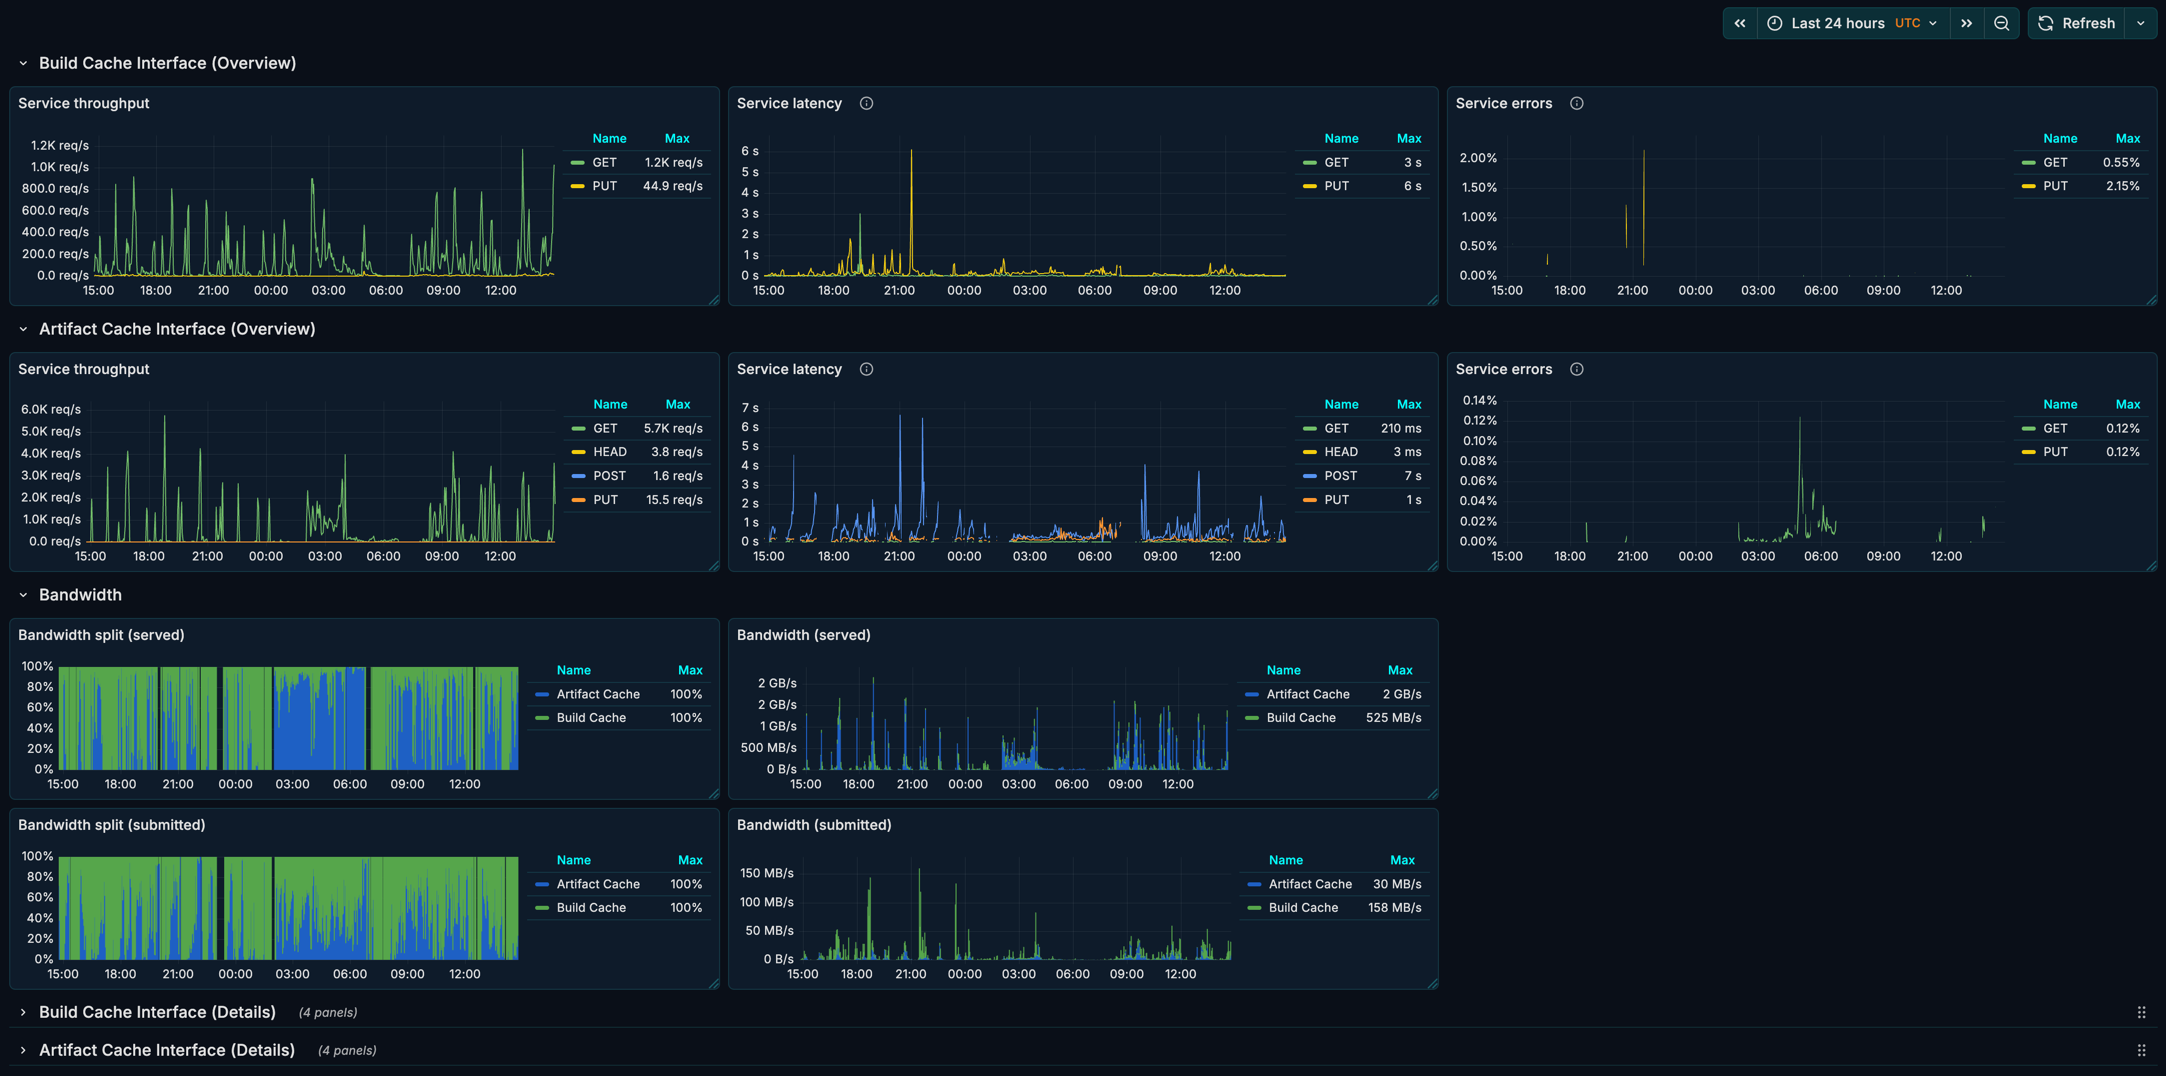
JSON file of the dashboard can be found in the appendix below.
Replication
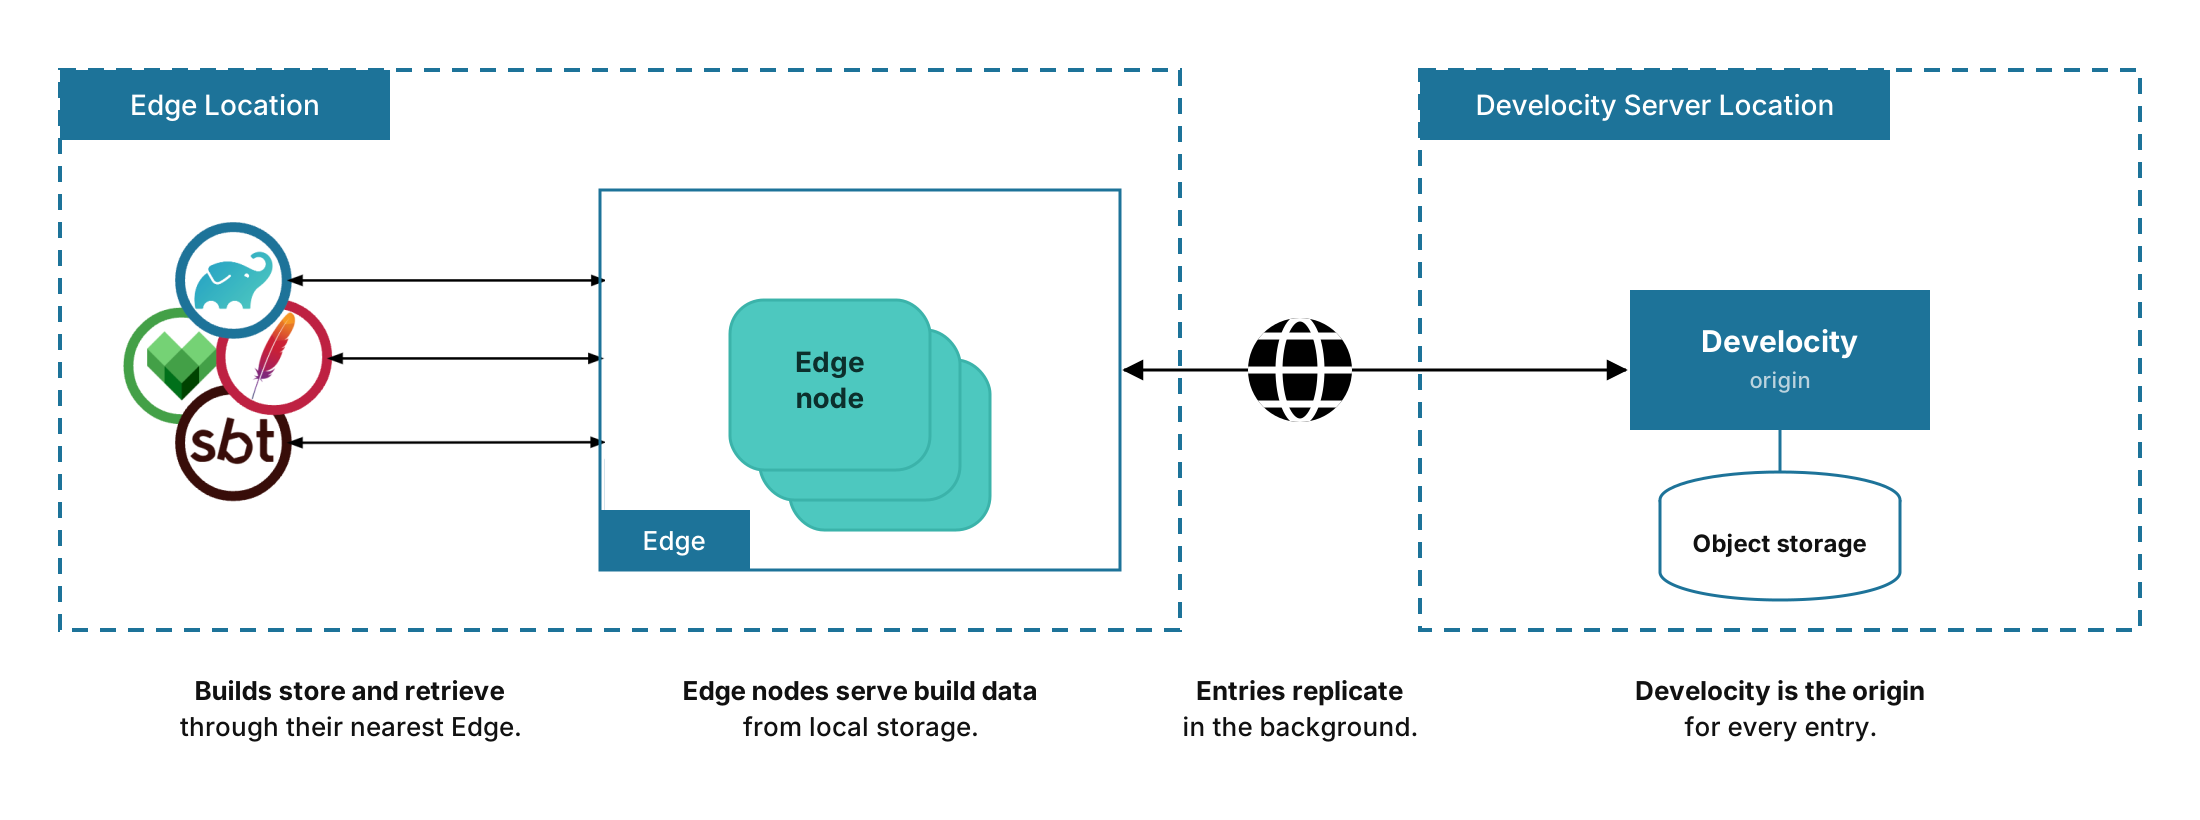
Replication makes build data stored at one Edge available at every other Edge. The Edge nodes deployed in the different Edge locations do not need to be able to connect to each other to establish a replication channel.
Develocity is the origin that holds a durable copy of every artifact stored at any Edge location. Edges establish a Develocity point of presence that is forward deployed in proximity to build agents to deliver artifacts at local network speed, fetching available artifacts from Develocity on-demand.
| The arrangement follows the Build Artifact CDN model. |
How Replication Works
When a build stores an artifact, the Edge node writes it to its own disk and returns success immediately. The node uploads the artifact to Develocity afterwards, on a background queue. The artifact becomes available to builds at other Edge locations once that upload completes.
When a build requests an artifact, the Edge node answers from its own disk first, then from peers at the same Edge when peering is enabled, and from Develocity last. Each node knows which artifacts the rest of the network holds, so it reports a miss itself instead of asking Develocity.
Replicated Content
By default, every Edge replicates all Universal Cache content.
| Content | Stored by |
|---|---|
Build Cache entries |
Build agents running Gradle, Apache Maven™, sbt, or Bazel builds |
Artifact Cache entries |
|
Setup Cache entries |
Before Develocity 2026.3, only Build Cache entries replicated to Edges outside the Develocity location. Artifact Cache and Setup Cache entries stayed at the Edge that stored them. Upgrading to Develocity 2026.3 extends replication to all three, so an artifact fetched once in one Edge location is reusable by builds in every other location.
On-Demand Replication
An Edge node copies an artifact into its location the first time a build there requests it, and serves every later request from its own disk. That first build waits for the transfer. A location ends up holding the artifacts its own builds use, and nothing else.
Replication is throttled in both directions so that builds keep priority on the Edge node. A node drops artifacts that arrive once its replication queue is full. A dropped download costs nothing, because the next request fetches the artifact again. A dropped upload leaves the artifact only on the node that stored it, where no other Edge can reach it.
Replication Costs
Replication consumes network transfer and object storage capacity.
-
Upload transfer. Each artifact stored at an Edge is uploaded once to Develocity, whether or not another location ever uses it.
-
Download transfer. Each Edge node downloads the artifacts its own builds request. Without peering, several nodes at one Edge fetch the same artifact separately. An evicted artifact is fetched again on its next request.
-
Cloud egress charges. Transfer between an Edge and Develocity often crosses a region or cloud boundary, which most providers bill for. Same-AZ (Availability Zone) transfer and ingress are frequently free, so check your provider’s pricing before you budget for it.
-
Object storage capacity. Object storage holds the union of what every Edge stores, so it grows with the number of Edges and with how much their content differs. Artifacts are addressed by fingerprint, so an artifact stored at several Edges is held once. Treat the floor in Verify Object Storage Settings as a minimum, and size above it when Edges hold largely different data.
Four options reduce it:
| Option | Effect |
|---|---|
Removes the Develocity server from the transfer path, cutting one hop and the bandwidth it consumes |
|
Nodes at one Edge share artifacts over the local network instead of each fetching the same artifact from Develocity |
|
On-demand replication |
Transfers only what builds request |
Stops all transfer for an Edge, and confines its data to that location |
Replication also protects an Edge against losing its data. Because Develocity holds every replicated artifact, an Edge node repopulates itself after a restart, a resize, or a replacement. You can therefore provision smaller local disks than a location’s working set would otherwise require.
Disabling Replication
Replication is enabled for every Edge by default.
To stop an Edge from replicating, clear the Enable Replication checkbox on the "Edit Edge" page.
In unattended configuration, replicationEnabled sets replication for an Edge at the moment it is created.
The field has no effect afterwards, so use the checkbox to change an existing Edge.
Turning it off stops transfer in both directions. The Edge stops uploading what it stores and stops fetching from Develocity, and it no longer tracks what the rest of the network holds. Builds at that Edge reuse only the data the Edge itself holds, and the data they produce stays there.
Data already transferred stays where it is. Artifacts the Edge already uploaded stay at Develocity and remain available to other Edges, and artifacts it already downloaded stay on its disk and keep serving its builds.
Disable replication when a location must keep its build data local, or when transfer between that location and Develocity is prohibitively slow or expensive. The cost is cross-location reuse, and the durable copy at Develocity. An Edge node with replication disabled holds the only copy of its data, so a lost disk loses it for good.
| Replication cannot be disabled for the co-located Develocity Edge. It serves the Develocity location as a low-latency cache, so its replication settings appear but cannot be edited. |
Leveraging Edges in Builds
Enabling Edge Discovery
The Develocity Gradle and sbt plugins, along with the Develocity Maven extension and npm Agent, provide an opt-in “Edge discovery” option, which uses the user’s location setting in Develocity to automatically assign an Edge to use as a remote Build Cache.
The Develocity Artifact Cache CLI uses the same mechanism to pick the Edge it stores dependency and Setup Cache artifacts to.
Using Edge discovery removes the need for extra local build configuration and allows Edge locations (and their address) to be updated dynamically as the Develocity server manages all configuration.
Develocity users can set their location in the "My Settings - Location" page of the Develocity user-interface.
| This feature can be used only when access key authentication is used by the build. |
Gradle Usage
(Develocity Gradle plugin 3.19+)
develocity {
    server = uri("https://develocity.example.com")
    edgeDiscovery = true
}| The Gradle build must also apply the Develocity Gradle plugin Build Cache connector for the discovered Edge to be used for remote build caching. |
Using an Edge Without Edge Discovery
A client can also target one Edge directly, without the Develocity server assigning it.
The Develocity Artifact Cache CLI does this with its --dv-edge option.
Access-key authentication then applies to the Edge rather than to the Develocity server.
The DEVELOCITY_ACCESS_KEY value is a «host name»=«access key» pair, and one entry has to name the Edge host:
export DEVELOCITY_ACCESS_KEY=edge.example.com=«access key»A value that covers only the Develocity server host leaves the request unauthenticated, and the Edge rejects it. Entries for several hosts can be listed together, separated by semicolons, so one CI secret can cover the Develocity server and an Edge. The client uses the entry matching the host it connects to and ignores the others:
export DEVELOCITY_ACCESS_KEY=develocity.example.com=«access key»;edge.example.com=«access key»See Connecting Without Edge Discovery in the Artifact Cache CLI manual for the full command line.
Edge Failover
A Develocity installation that includes multiple Edge locations can benefit from increased build acceleration continuity through Edge failover.
Normally, if a build encountered a Build Cache error, remote caching would be disabled for the remainder of the build. With Edge discovery enabled, if an error occurs while interacting with an Edge’s Build Cache service, the build agent will automatically attempt to fail over to another available Edge. This gives the build a chance to continue taking advantage of remote caching and realize further build time savings.
| The Develocity server itself is considered an Edge and can be used as a failover target by builds. |
When a failover is necessary, the build agent will choose a new Edge from the list of available Edges discovered at the start of a build. The selection prioritizes the Edge to which the build agent has the lowest latency (and below a certain threshold) at time of failover.
Build Scan Integration
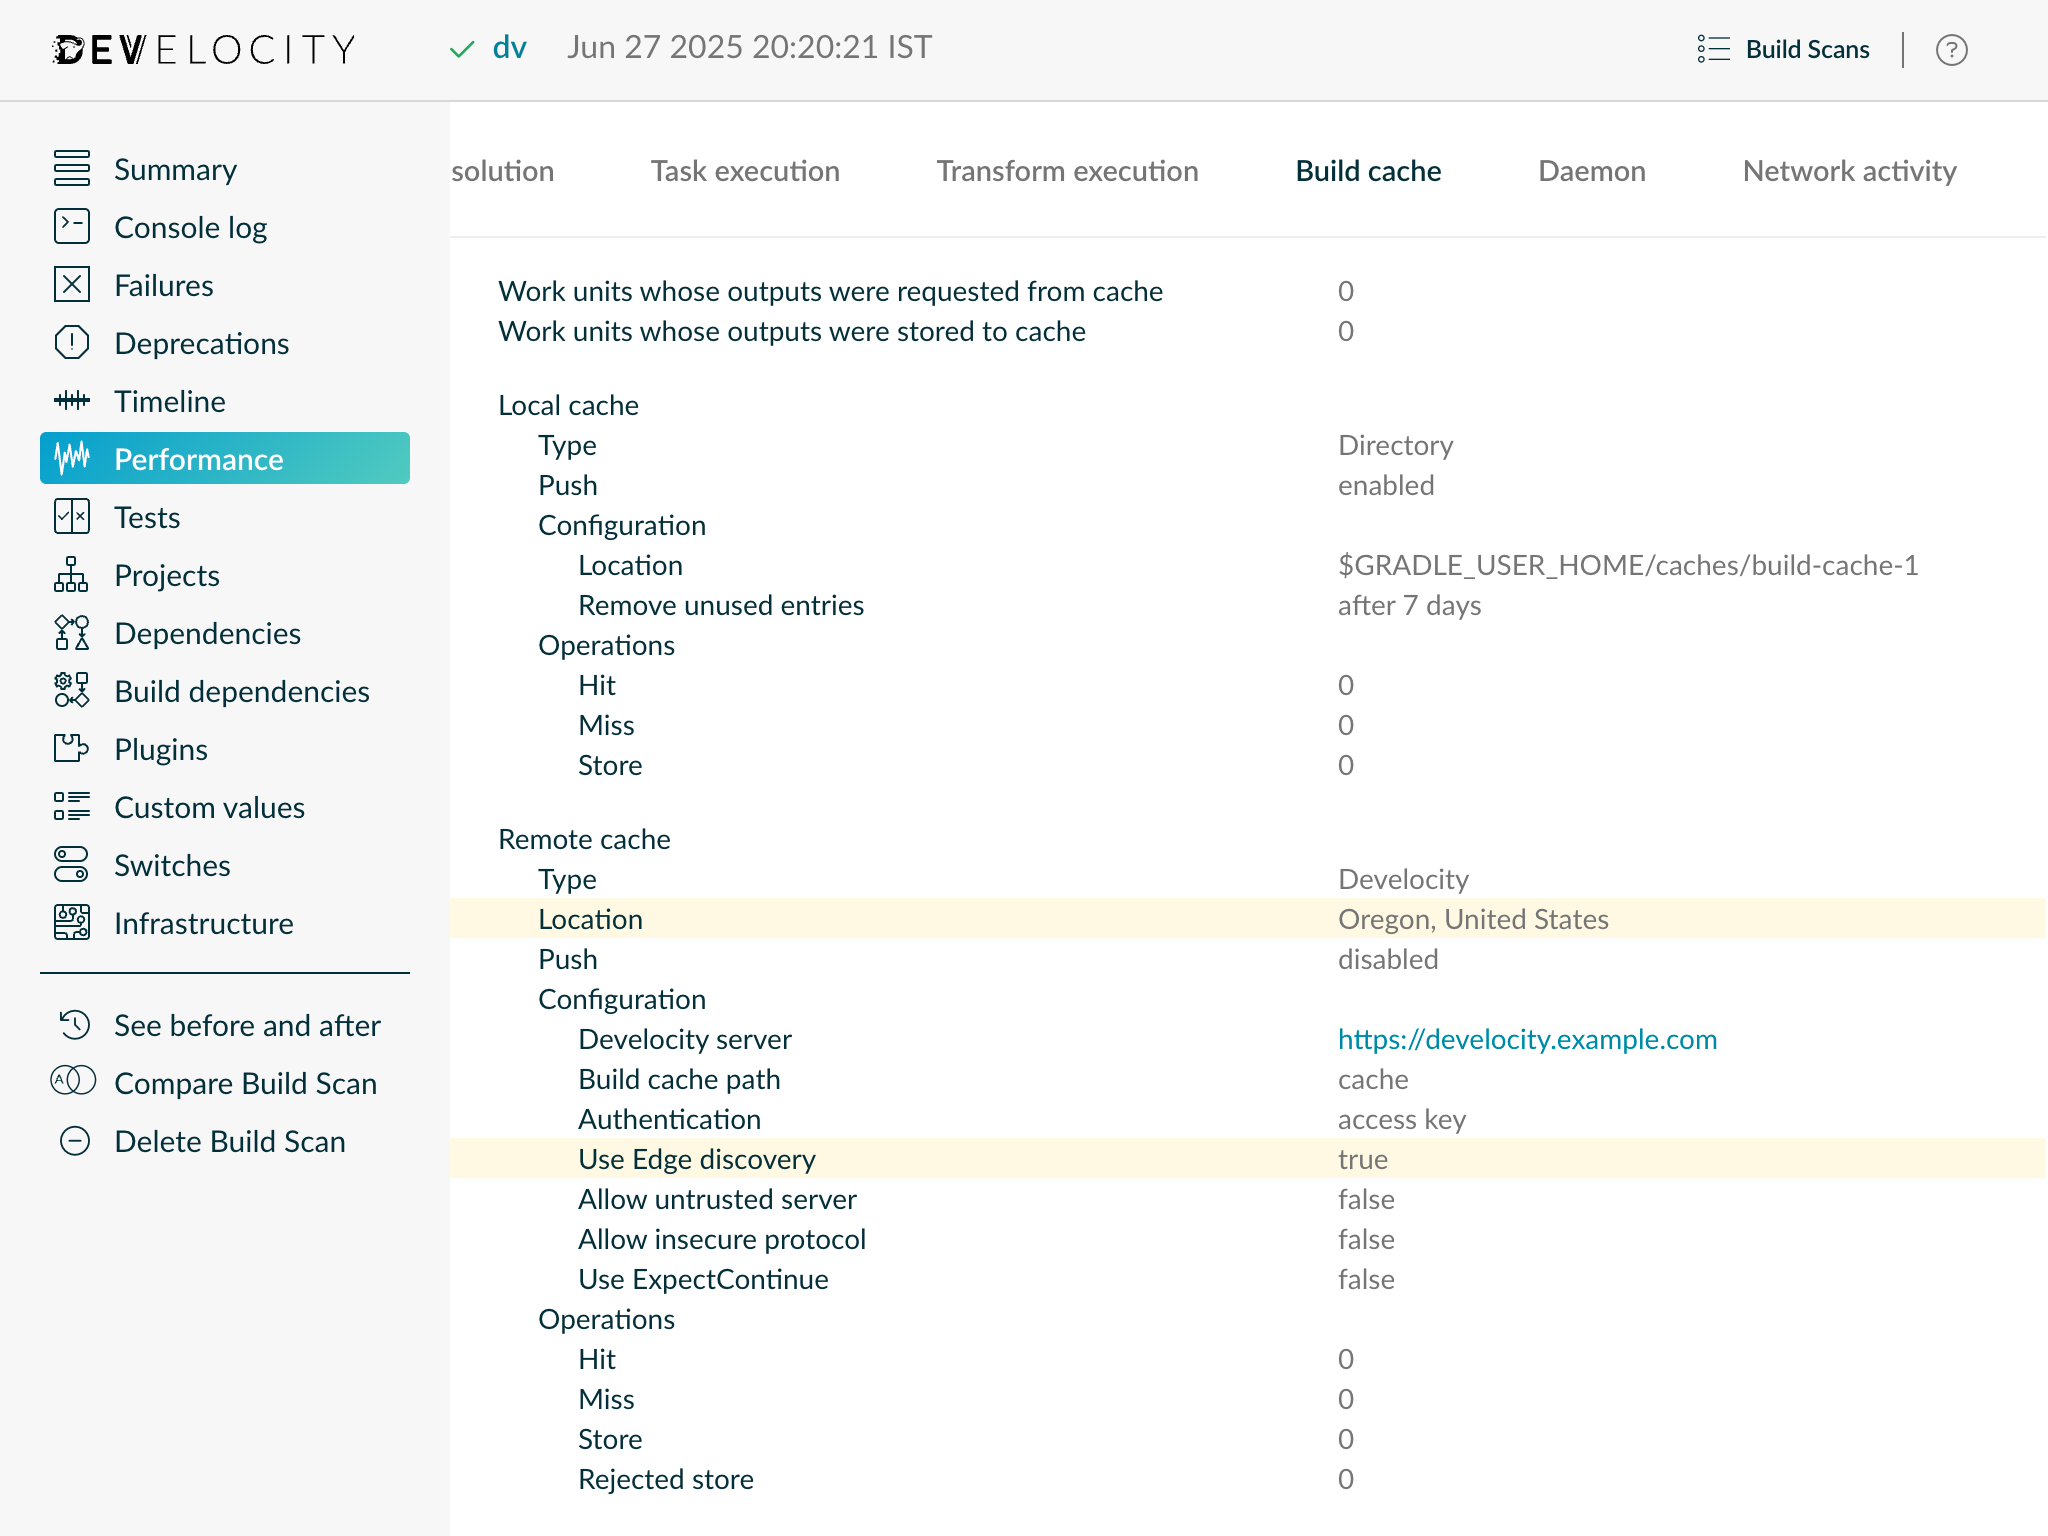
Whether the Edge discovery option was enabled for a build is visible under the “Performance → Build Cache” tab of Build Scan.
When Edge discovery is enabled, the location of the Edge used by a build for remote build caching will be visible here too.
| This information is available starting from Develocity 2025.1 only if the build was run with either the Develocity Gradle plugin 4.0+, Develocity Maven extension 2.0+ or sbt plugin 1.3+. |
Proxying Build Scan and MCP Traffic
Edges can act as a transparent proxy, forwarding Build Scan uploads and Model Context Protocol (MCP) requests from build and AI agents to the central Develocity server.
This is useful in network environments where build and AI agents cannot reach the Develocity server directly. By routing traffic through an on-premises Edge node, you avoid configuring each agent individually with corporate proxy credentials. Only the Edge node itself requires external network access to the Develocity server.
|
To view a published Build Scan you still need direct access to the Develocity server. |
Key characteristics of using Edge nodes for proxying:
-
Proxied requests are forwarded directly to the Develocity server. Nothing is stored on the Edge nodes.
-
Authentication of the calls is delegated to the Develocity server. The Edge node just forwards all the authorization data.
-
If the connection between the Edge node and the Develocity server is disrupted, proxied calls will fail immediately.
Build Scan Proxying
You can configure build agents to send Build Scan data through an Edge instead of directly to the Develocity server.
Configuring Build Agents
Point the Develocity server URL in your build configuration to the Edge address.
develocity {
    server = uri("https://edge.example.internal")
}<develocity>
<server>
<url>https://edge.example.internal</url>
</server>
</develocity>ThisBuild / develocityConfiguration ~= { previous =>
previous
.withServer(
previous.server
.withUrl(url("https://edge.example.internal"))
)
}module.exports = {
server: {
url: 'https://edge.example.internal',
},
}def develocity_configuration(configuration):
configuration.develocity_url = 'https://edge.example.internal'
return configurationAccess Key Configuration
When a build agent communicates with an Edge location, it looks up the access key based on the Edge public address hostname rather than the Develocity server hostname. You must map your existing Develocity access key to the Edge hostname so that the agent can authenticate when routing through the Edge.
Add an entry for the Edge node hostname in your access key configuration file:
develocity.example.com=<your-access-key>
edge.example.internal=<your-access-key>
The first entry is the original Develocity server mapping. The second entry maps the same access key to the Edge hostname.
The access key may also be specified via the DEVELOCITY_ACCESS_KEY environment variable.
DEVELOCITY_ACCESS_KEY=edge.example.internal=<your-access-key>| Without this mapping, builds routed through the Edge node fail with authentication errors because the agent cannot find an access key matching the Edge hostname. |
MCP Proxying
Edge nodes can proxy Model Context Protocol (MCP) requests from AI agents to the MCP servers provided by Develocity. This allows AI agents operating within restricted networks to access Develocity MCP services via the Edge.
Two MCP services are available to route to:
- Develocity MCP Server
-
The Develocity MCP Server, accessible at the
/mcpendpoint on the Edge node. - Develocity Analytics MCP Server
-
The Develocity Analytics MCP Server, accessible at the
/drv-mcpendpoint on the Edge node.
Configuring AI Agents
Configure your AI agent to use the Edge node address for MCP endpoints.
{
  "mcpServers": {
    "develocity": {
      "type": "http",
      "url": "https://<edge-hostname>/mcp"
    },
    "develocity-reporting": {
      "type": "http",
      "url": "https://<edge-hostname>/drv-mcp"
    }
  }
}
Replace <edge-hostname> with your Edge public address.
Serving the Artifact Cache CLI
Edges can serve the Artifact Cache CLI to your CI agents. A CI job then fetches the CLI from the Edge it already uses for the cache, instead of downloading it from the public internet or from a copy you host yourself.
A request names an exact CLI version. The Edge serves that version from local disk when it already holds it. Otherwise, the Edge asks Develocity, which downloads the version from the public release channel, verifies its SHA-256 checksum against the published checksum, and returns it. The Edge writes the file to local disk before serving it, so later requests for the same version are answered locally.
Key characteristics of serving the Artifact Cache CLI:
-
The requested version is the version served. Develocity never resolves a version range, and it never substitutes a different CLI version for the one a CI job asked for.
-
Develocity verifies the checksum before any byte reaches an Edge, and retains nothing itself.
-
Each Edge maintains its own copies. A version held by one Edge is downloaded again the first time a different Edge is asked for it.
-
Develocity requires outbound access to the release channel at
https://docs.develocity.ai. Edges never reach the release channel directly. -
Operators can seed a version instead, which removes the need for that outbound access. See Seeding a CLI Version.
| Serving the Artifact Cache CLI is enabled by default, and both serving and seeding can be turned off for your installation. Please contact Develocity support to change either setting. |
Requirements
-
Edge node 2.3.0 or later, connected to Develocity 2026.3.0 or later.
-
A Develocity access key whose user can read Build Cache data. Any one of the Build Cache permissions grants this: "Read Build Cache data", "Read and write Build Cache data", or "Read Build Cache data and write Bazel CAS data". CI agent users configured for Artifact Cache hold "Read and write Build Cache data".
-
Outbound HTTPS access from Develocity to the release channel, unless every version your CI jobs request is seeded.
Downloading a CLI Version
Request an exact version from the Edge, authenticating with a Develocity access key:
curl --fail --location \
  --header "Authorization: Bearer ACCESS_KEY" \
  --output develocity-artifact-cache-cli.jar \
  https://edge.example.internal/edge/assets/artifact-cache-cli/1.7.0
The artifact-cache-cli path segment names the asset type, and the segment after it names the CLI version.
A HEAD request returns the same headers without the file body, which is useful for checking availability.
The response carries the media type and the file name of the artifact, so a client that saves the response under its supplied name gets a runnable JAR file.
The endpoint answers with the following statuses:
| Status | Meaning |
|---|---|
|
The version is returned, either from the Edge’s local disk or after Develocity downloaded it. |
|
The asset type or version segment contains characters that are not permitted. |
|
The access key is missing, invalid, or its user cannot read Build Cache data. |
|
The asset type is unknown, serving is turned off, or the version is neither seeded nor published by the release channel. In an air-gapped installation, where the release channel is disabled, any version that no operator has seeded answers with this status. |
|
The file the release channel returned did not match its published checksum. Develocity forwards no bytes to the Edge. |
|
Develocity is already downloading as many versions as it permits at once, or the Edge is not connected to Develocity. A |
The Edge does not serve the .sha256 checksum or the .asc signature files alongside the JAR file, so a CI job cannot verify the download locally.
Develocity verifies the checksum before an Edge stores the file.
To verify the JAR file yourself, download it from the release channel as described in Hosting the Binary Yourself.
|
Local Storage and Eviction
An Edge keeps the CLI versions it has served in a dedicated folder inside its data directory, and that folder counts toward the Edge’s total disk usage. The folder holds up to 500 MiB by default.
A maintenance task enforces the budget every 60 seconds, rather than a check on each request. When the folder exceeds its budget, the file with the oldest creation time is evicted first, regardless of how often it was requested. An evicted version is fetched again the next time a CI job asks for it. This budget is separate from the Edge’s Build Cache target size, and each is enforced on its own.
The first request for a version on a given Edge is slower than the requests that follow it. Develocity holds the whole file to verify its checksum, and the Edge writes the file to disk before responding, so the CI job waits for both steps.
Seeding a CLI Version
Seed a CLI version to make it available without the release channel. Two situations call for it: an air-gapped installation, where Develocity has no route to the release channel at all, and an installation whose security process requires every binary to be reviewed before it is served.
An operator uploads the JAR file to an Edge, which stores it in the object storage bucket that Develocity uses for the Build Cache. Every Edge then serves that version, and no Edge contacts the release channel for it. A seeded version is durable because it lives in object storage, not because it is exempt from eviction: an Edge’s local copy counts against the eviction budget described above like any other, and an evicted copy is fetched again from object storage rather than from the release channel. Seeding a version is permanent for that version number: no endpoint removes a seeded file, and an operator who needs one gone deletes the object from the bucket directly.
Upload the JAR file with a PUT request naming the version it provides:
curl --fail \
  --request PUT \
  --header "Authorization: Bearer ACCESS_KEY" \
  --header "Content-Type: application/java-archive" \
  --upload-file develocity-artifact-cache-cli-1.7.0.jar \
  https://edge.example.internal/edge/assets/artifact-cache-cli/1.7.0
Seeding requires the following:
-
Object storage configured for the Build Cache. Without it, the Edge does not expose the upload endpoint. See Verify Object Storage Settings.
-
A Develocity access key whose user holds the Read and write Build Cache data permission.
-
A
Content-Lengthheader on the request, whichcurlsets from the file. The request is rejected with411 LENGTH REQUIREDwithout it. -
A file of 256 MiB or less. A larger file is rejected with
413 REQUEST ENTITY TOO LARGE.
A version can be seeded once.
A second upload of a version that is already published is rejected with 409 CONFLICT, and the published file is left untouched.
A 404 NOT FOUND means seeding is unavailable on this installation, either because it is turned off or because the Build Cache has no object storage.
A seeded version takes precedence over the release channel, including over a copy an Edge had already downloaded from the channel. Running with both seeding and channel downloads enabled therefore gives you the release channel with per-version overrides.
| Nothing inspects a seeded file. Develocity accepts whatever an operator uploads as the CLI for the named version, and every CI job that requests that version receives it. Verify the JAR file’s checksum and signature before you upload it, as described in Hosting the Binary Yourself. The "Read and write Build Cache data" permission is enough to seed a version, and CI agent access keys normally hold it, so treat that permission as the boundary that protects this endpoint. |
Using HTTPS
By default, Edge nodes serve over HTTP. Using HTTPS requires extra configuration.
Using Your Own Certificate
To use your own certificate, specify the path to an X.509 certificate (including intermediates) using the cert-file option
and the path to your PKCS#1 or PKCS#8 private key using the key-file option.
Both files must be in PEM format.
java -jar edge-node-2.3.0.jar start --cert-file ./ssl.crt --key-file ./ssl.keyOr when using the Docker image:
docker run --detach \
    --volume /opt/edge-node:/data \
    --publish 5071:5071 \
    gradle/edge-node:2.3.0 \
    start
    --cert-file /data/ssl.crt --key-file /data/ssl.key
Using a generated certificate
You can have the server generate its own self-signed certificate to use.
To do this, specify the --generate-self-signed-cert argument to the node application.
java -jar edge-node-2.3.0.jar start --generate-self-signed-certOr when using the Docker image:
docker run --detach \
    --volume /opt/edge-node:/data \
    --publish 5071:5071 \
    gradle/edge-node:2.3.0 \
  start
  --generate-self-signed-cert
This certificate won’t be trusted by clients, and will require extra configuration by clients.
Please consult the Gradle user manual or Develocity Maven Extension User Manual for how to configure Gradle or Maven builds to accept an untrusted SSL connection.
Allowing Untrusted SSL Connections
By default, the Edge node won’t allow connections to Develocity if the Develocity serves over HTTPS and present untrusted certificates (e.g. self-signed).
In order to allow such connections, the Edge node must be started with the --allow-untrusted-ssl argument, as follows:
Docker
docker run --detach \
    --volume /opt/edge-node:/data \
    --publish 5071:5071 \
    gradle/edge-node:2.3.0 \
start --allow-untrusted-sslJAR
java -jar edge-node-2.3.0.jar start --allow-untrusted-sslIf you have any questions or need any assistance contact the Develocity support team or your customer success representative.
|
Looking for an older version? The JAR download links below work for any released version. Replace the version in the file name with the one you need. |
Appendix B: Verifying the Signature of the Edge Node Artifacts
The Edge node JAR and schema are published to docs.develocity.ai alongside its signatures. The public key is published to keys.openpgp.org. You can verify the signature of the JAR as follows:
curl -OL https://docs.develocity.ai/downloads/edge-node/edge-node-2.3.0.jar && \
  curl -OL https://docs.develocity.ai/downloads/edge-node/edge-node-2.3.0.jar.asc && \
  gpg --keyserver keys.openpgp.org --recv-key 15D543CA40743FFA47654C16622DE19DC011B9BE && \
  gpg --verify edge-node-2.3.0.jar.asc edge-node-2.3.0.jar
The output of the last command should look similar to the following:
gpg: Signature made Mon Sep  7 06:05:18 2026 UTC
gpg:                using RSA key D9B2DFBD9F3298BA
gpg: Good signature from "Gradle Inc. <[email protected]>" [unknown]
gpg: WARNING: This key is not certified with a trusted signature!
gpg:          There is no indication that the signature belongs to the owner.
Primary key fingerprint: 15D5 43CA 4074 3FFA 4765  4C16 622D E19D C011 B9BE
     Subkey fingerprint: E287 9931 BCA1 A42E 55F2  D64D D9B2 DFBD 9F32 98BA
This verifies that the artifact was signed with the private key that corresponds to the imported public key.
The warning is emitted because you haven’t explicitly trusted the imported key (therefore [unknown]).
One way of establishing trust is to verify the fingerprint over a secure channel.
Please contact technical support should you want to do so.
Signatures are made by the signing subkey, not by the primary key.
Importing the primary key 15D543CA40743FFA47654C16622DE19DC011B9BE brings the subkey with it, which is all gpg --verify needs.
Where a tool records the key that made the signature, give it the subkey’s full 40-character fingerprint, E2879931BCA1A42E55F2D64DD9B2DFBD9F3298BA; Gradle’s dependency verification, for one, rejects the shorter long ID D9B2DFBD9F3298BA that gpg prints.
|
This key signs Edge node 2.3.0 and every later release.
Edge node 2.2.0 and earlier were signed with the previous key, |
Appendix C: Migrating from a Build Cache Node Installation
When moving from an existing Build Cache node installation to Develocity Edge there are additional actions that should be considered before setting up Edges.
Configuring Object Storage for Develocity
Refer to the Verify Object Storage Settings section of this manual.
Preserving Existing Build Cache Data
Edge nodes use a different data indexing subsystem. The path to the existing Build Cache node’s data directory shouldn’t be specified on Edge node start-up to the --data-dir option and a new directory specified instead.
If preserving existing Build Cache data is desirable, it’s recommended to confirm that existing Build Cache nodes in the network don’t have the Legacy replication mode enabled.
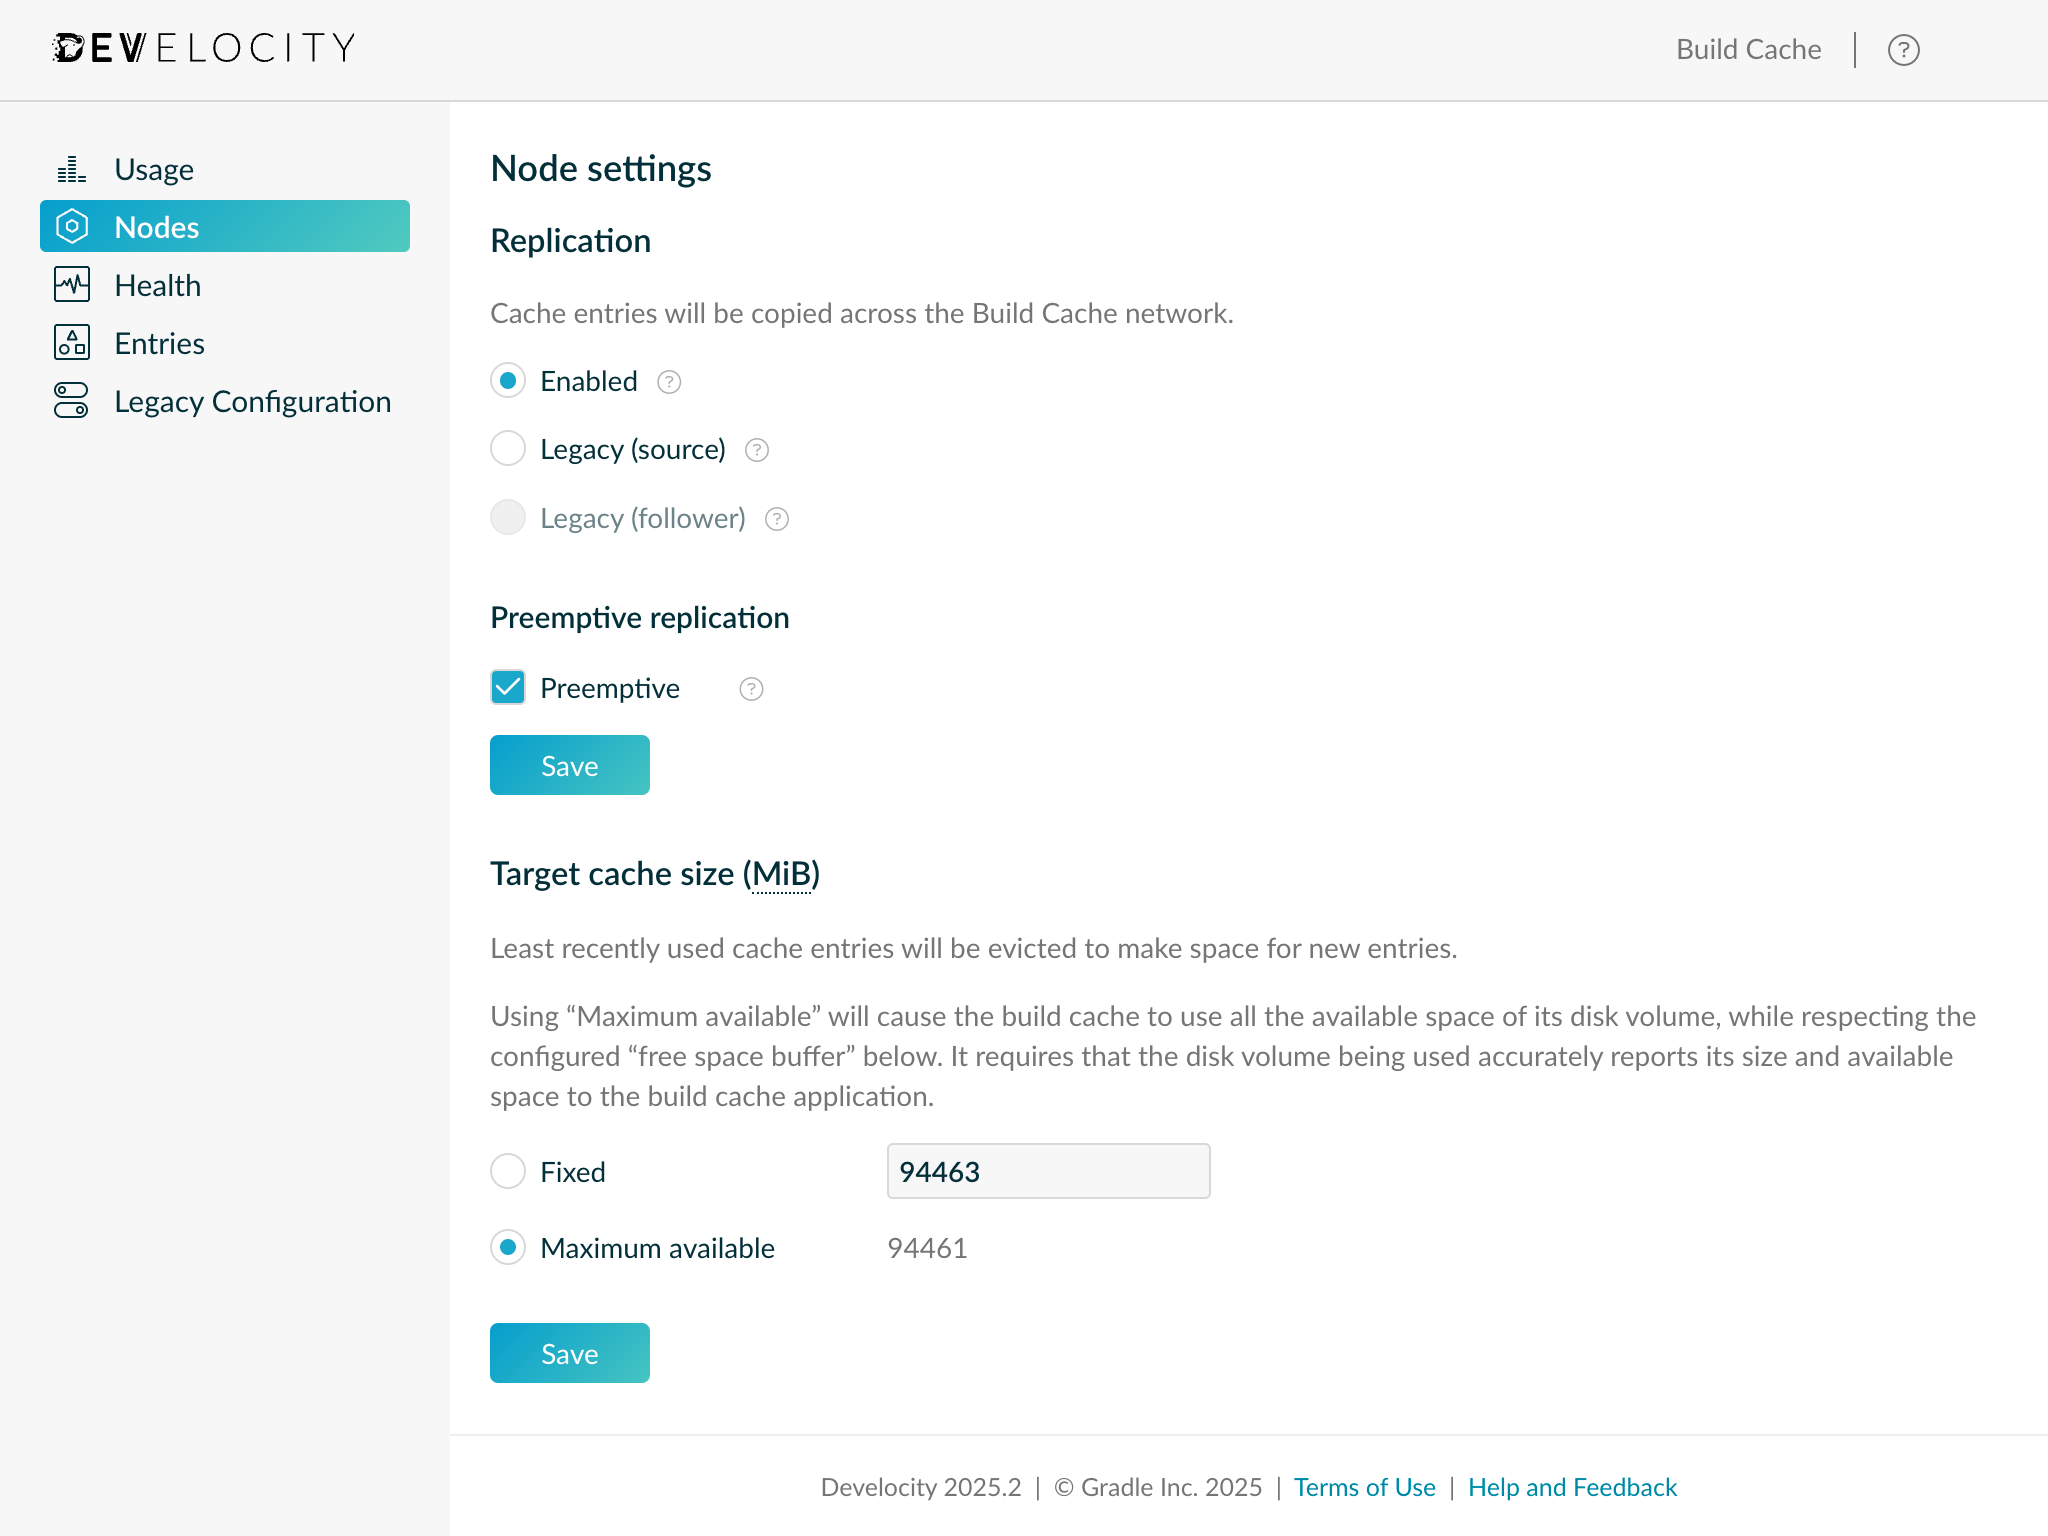
By disabling Legacy replication, Build Cache nodes will begin replicating to the Develocity server newly stored Build Cache entries, which in turn immediately become available to nodes in the Edge network. It’s therefore possible to perform a phased migration towards the adoption of Develocity Edge, without incurring a temporary degradation in Build Cache hit rates.
Storage Management Configuration
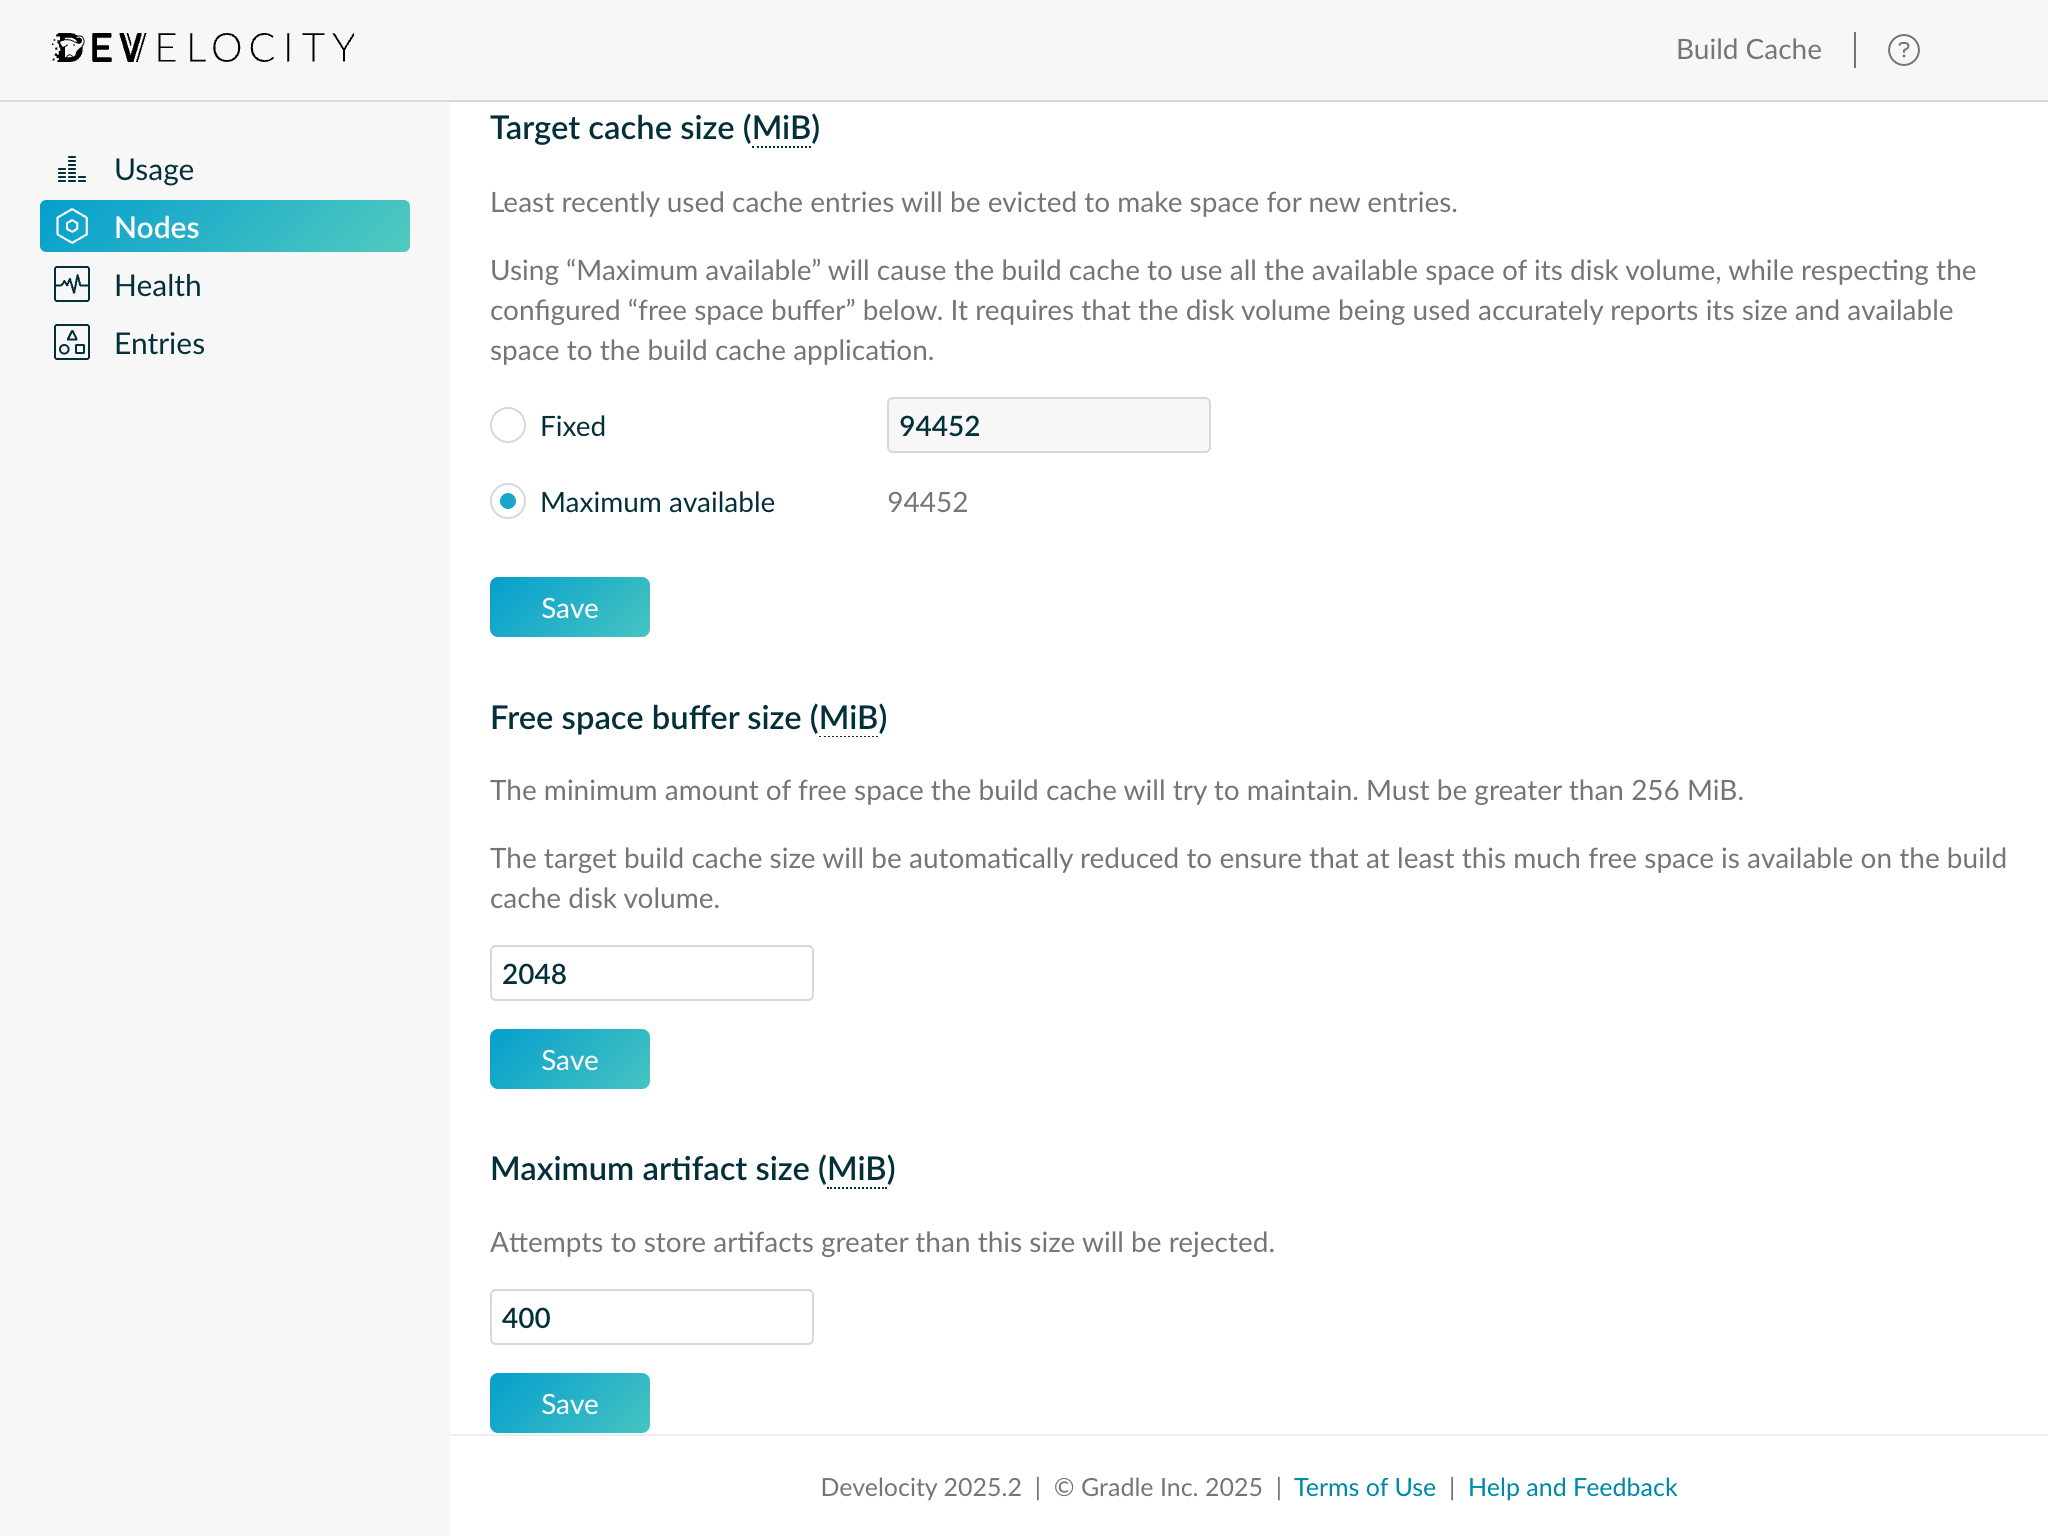
Edge nodes have a simplified storage management configuration model compared with Build Cache nodes. By default, Edge nodes use all the storage provided by the attached host volume (with a free space buffer). This is equivalent to the “Maximum available” setting provided by the Build Cache node app. However, it’s recommended to set an explicit target storage size if the Edge node shares a storage volume with other applications, runs in Kubernetes or will regularly store large build artifacts.
Prior to installation, please review the existing Build Cache node storage management configuration.
The existing configuration can be viewed either via the Develocity Build Cache administration page or by inspecting the configuration file passed to the Build Cache node using the --config-dir option on start up.
Refer to the Build Cache node user manual for details of how the target storage size configuration appears in the file.
Username-Password Build Cache Access Control Discontinued
In Develocity version 2024.3 support for username-password Build Cache access control was discontinued.
See the accompanying discontinuation notice in the 2024.3 release notes for instructions on how to migrate to Develocity account-based access control.